
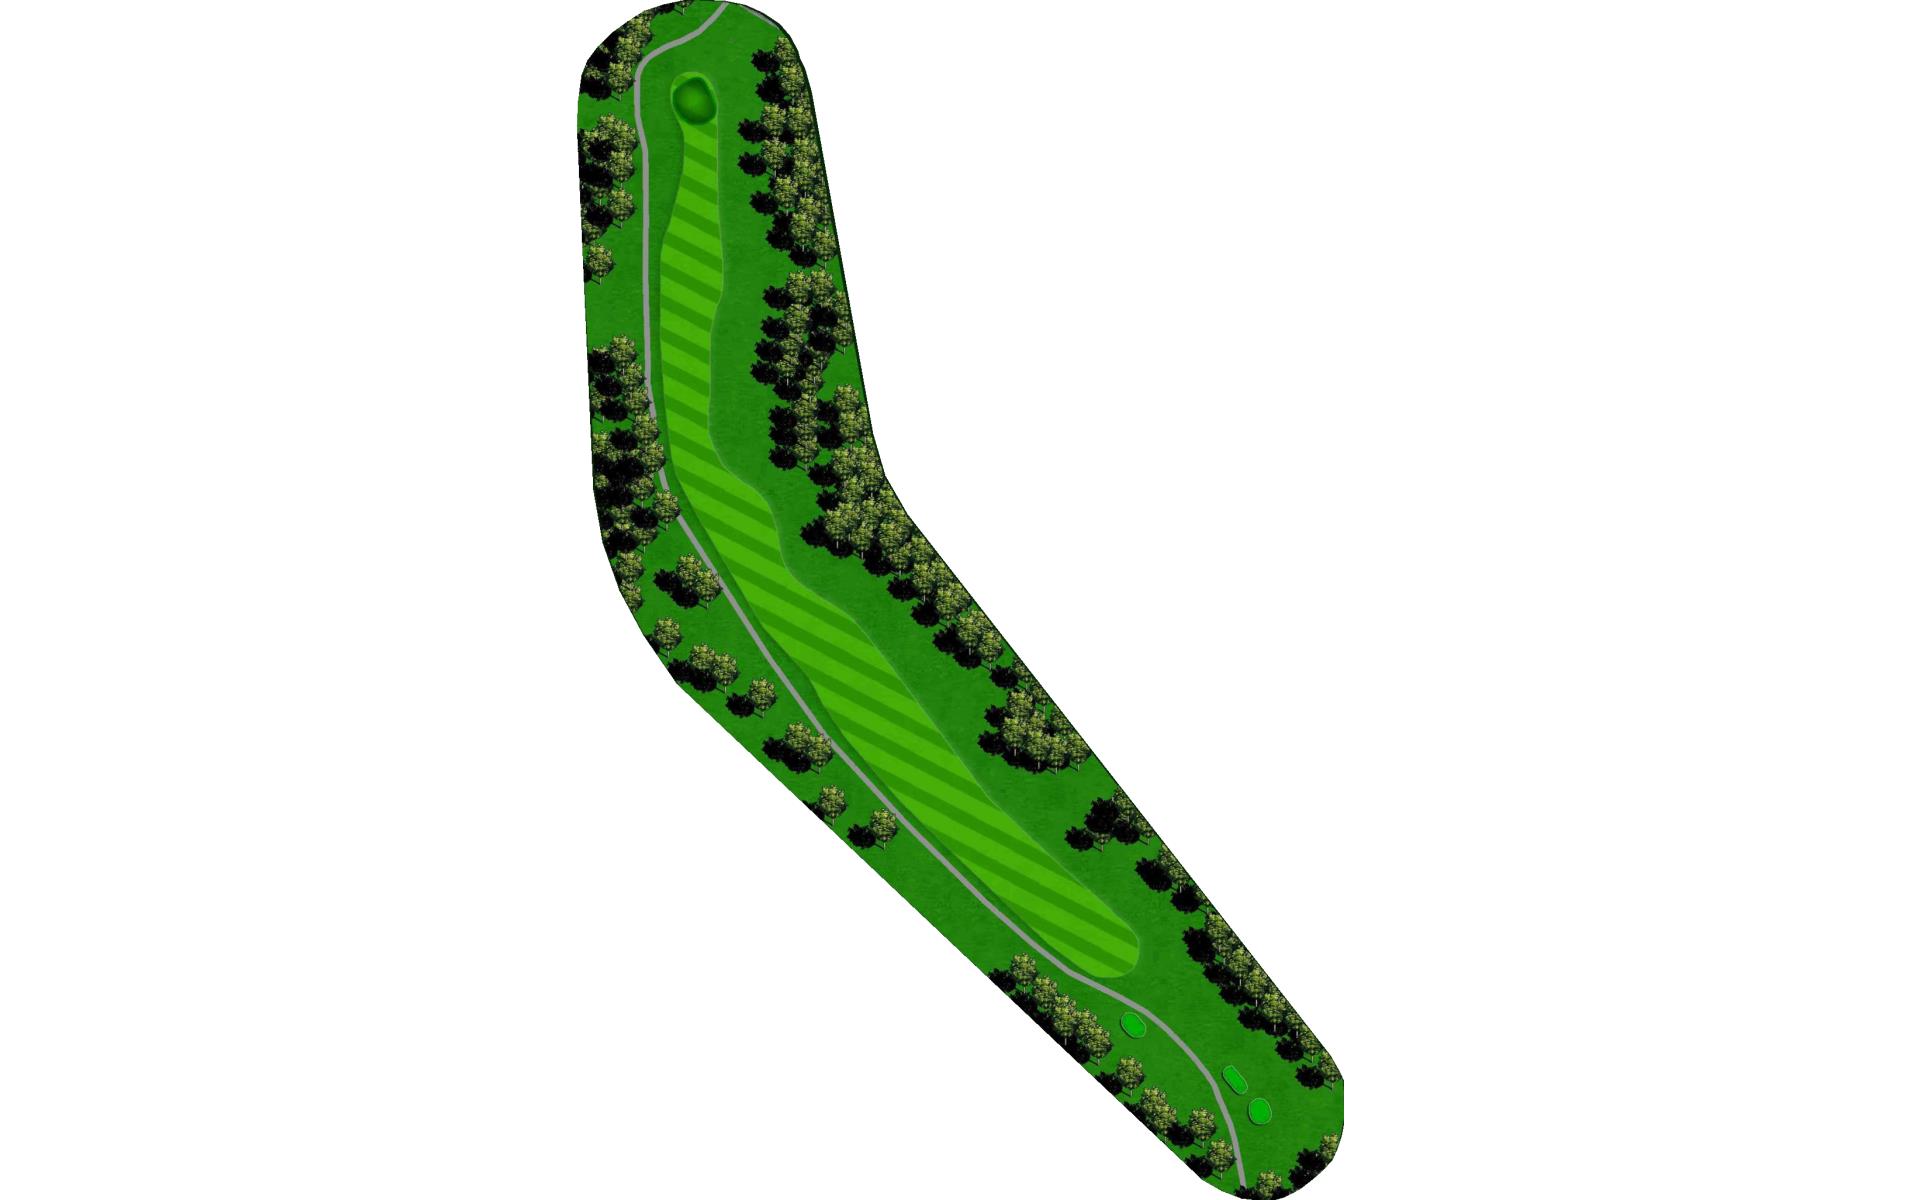
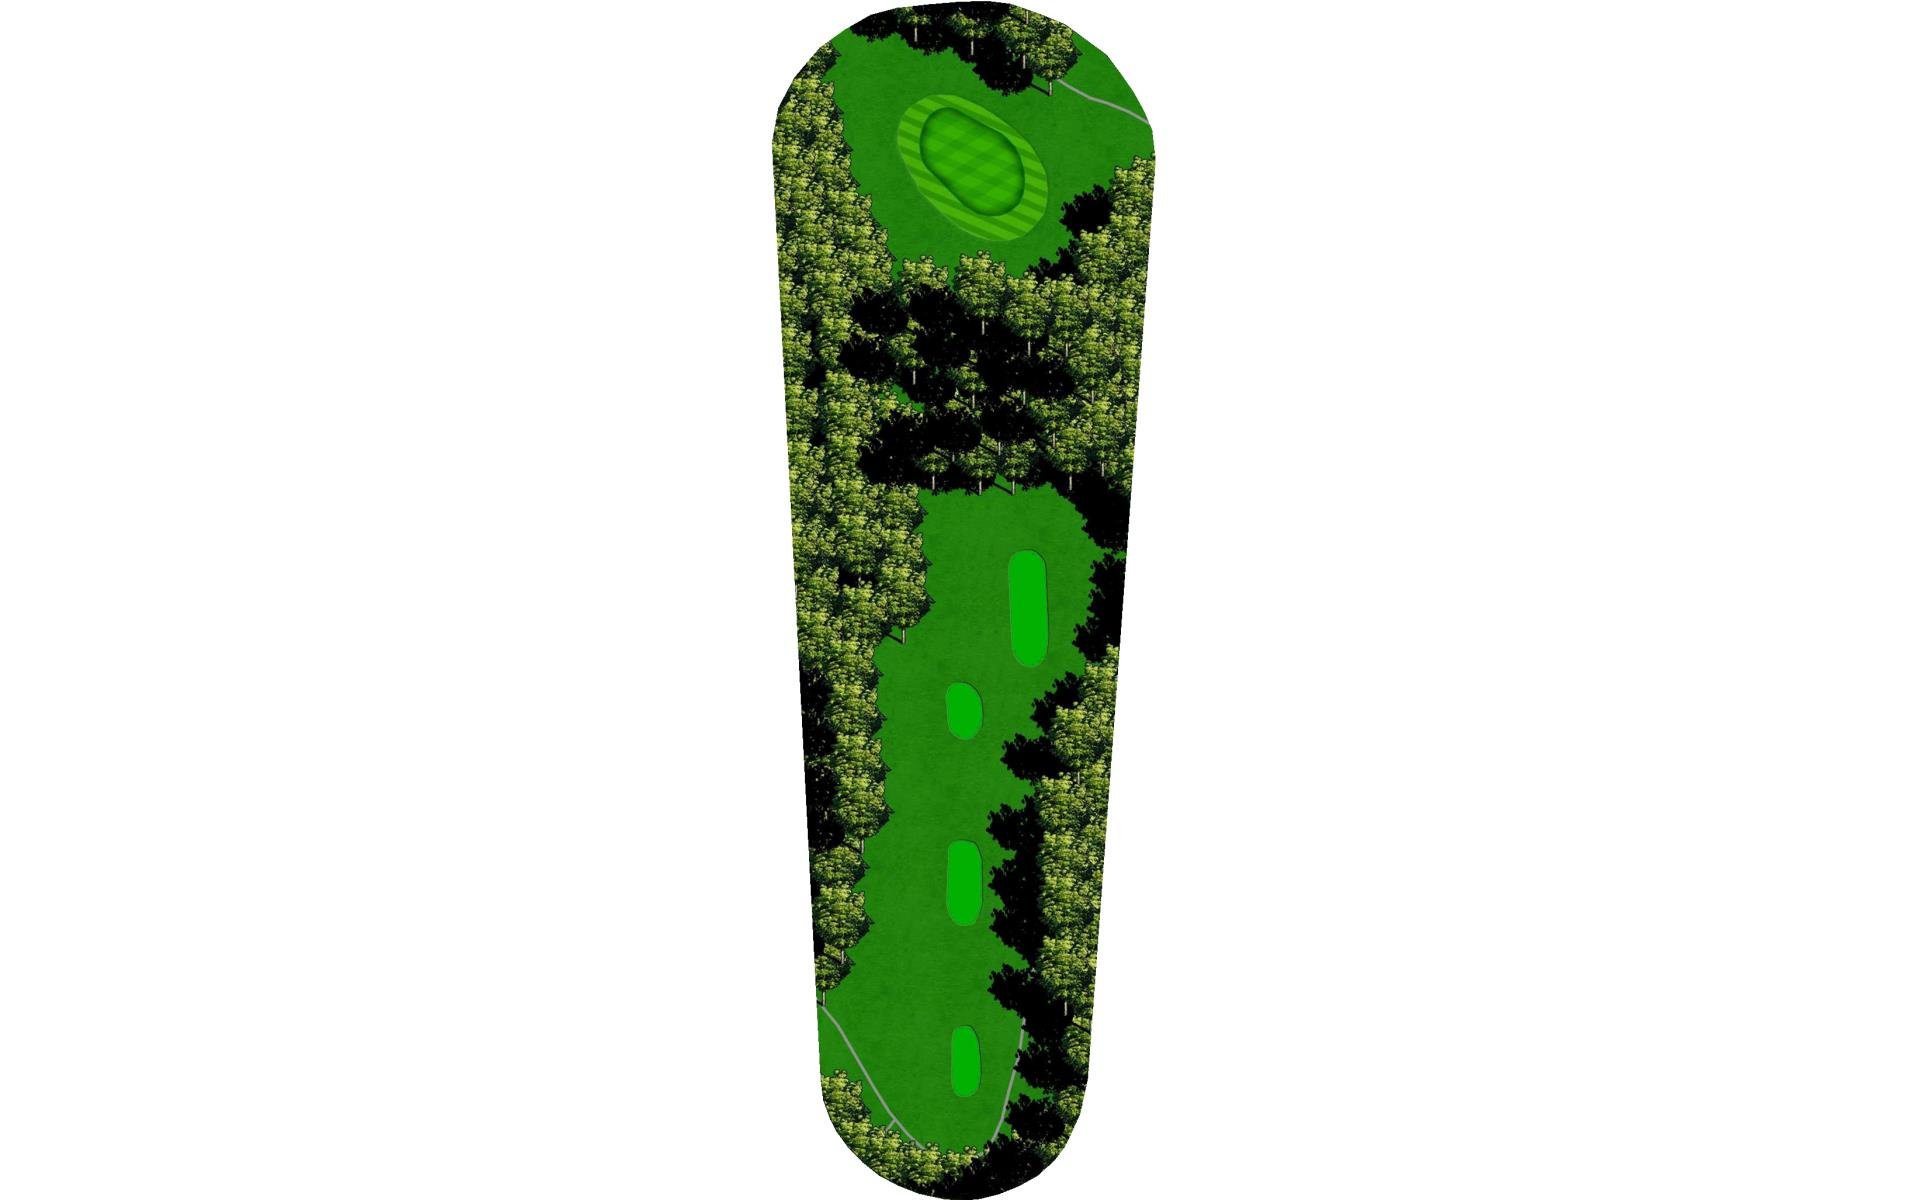
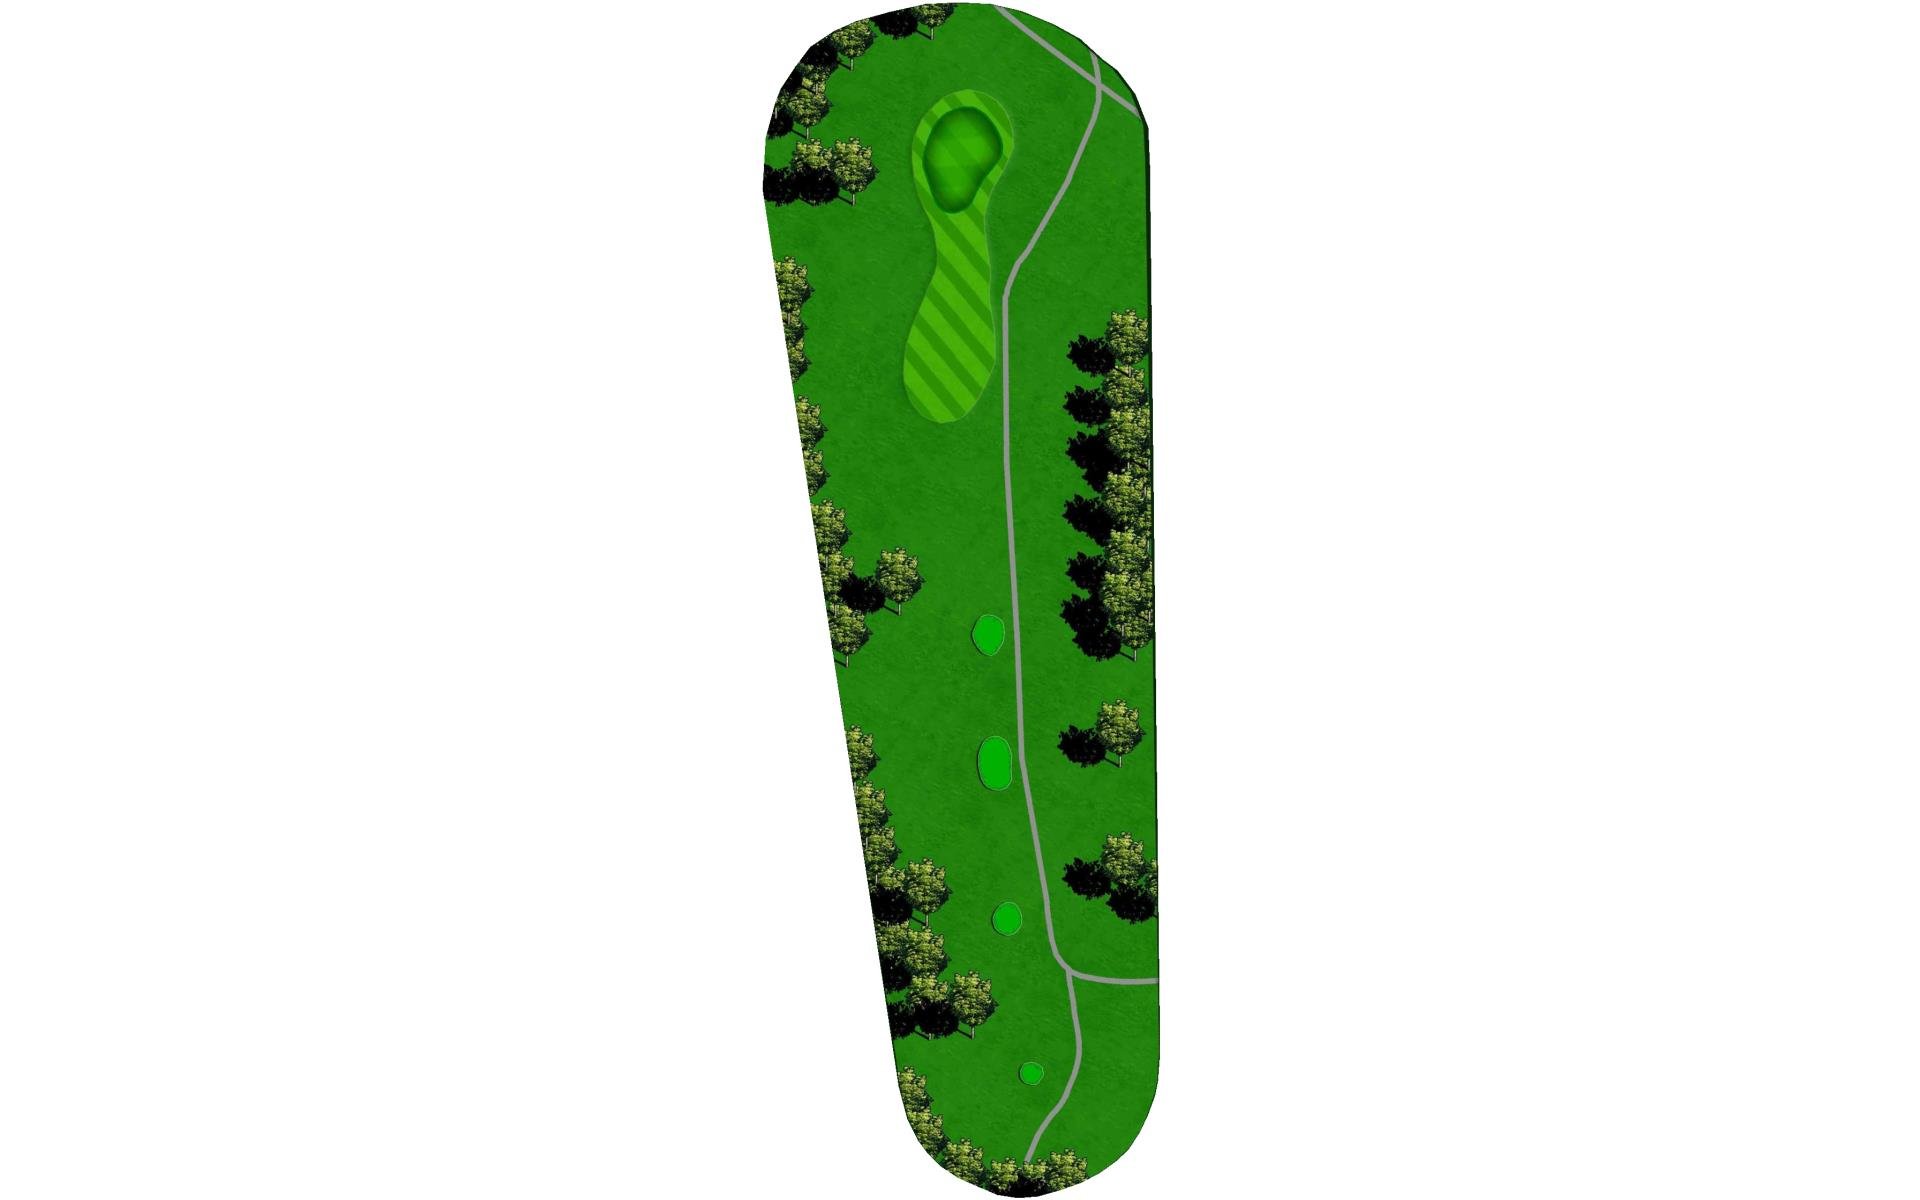
Live Oak Course
Designer: Leon Howard

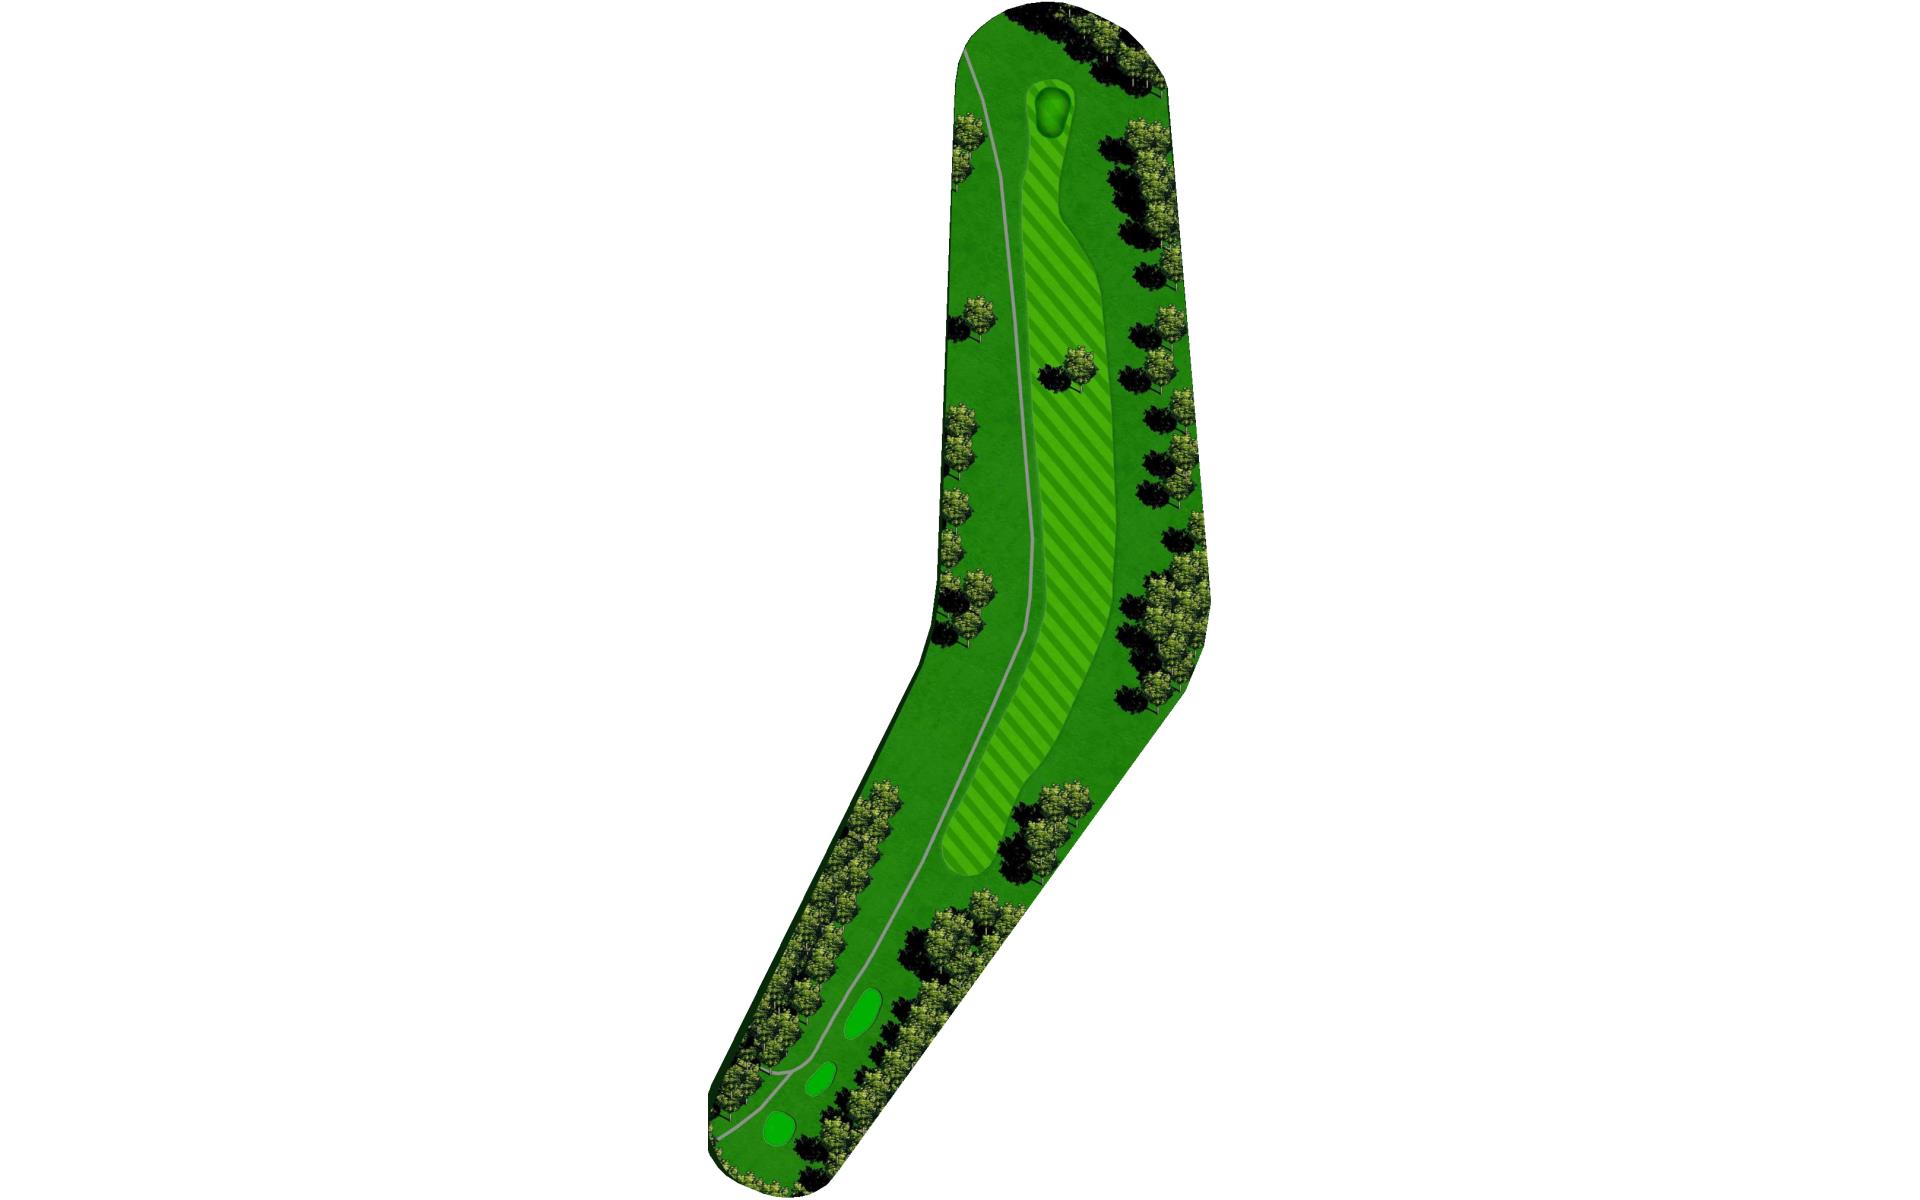
# 1 /
Par: 4
Yardage by Tee:
Gold 415
Blue 398
Combo 350
COPPER 350
Slope:
Gold 72.7/123 | Blue 71.2/120 | Combo 68.2/116 | White 67.5/113 | Red 71.8/123
Pro Tips
WELCOME! Try to keep your tee shot down the right side of the fairway, otherwise the tree on the left side will block your approach to the green. The water hazard in the right rough is reachable from the tee only by the longest hitters. The green is one of the most severe on the golf course, sloping from back to front. Try to keep your ball BELOW the hole if at all possible.

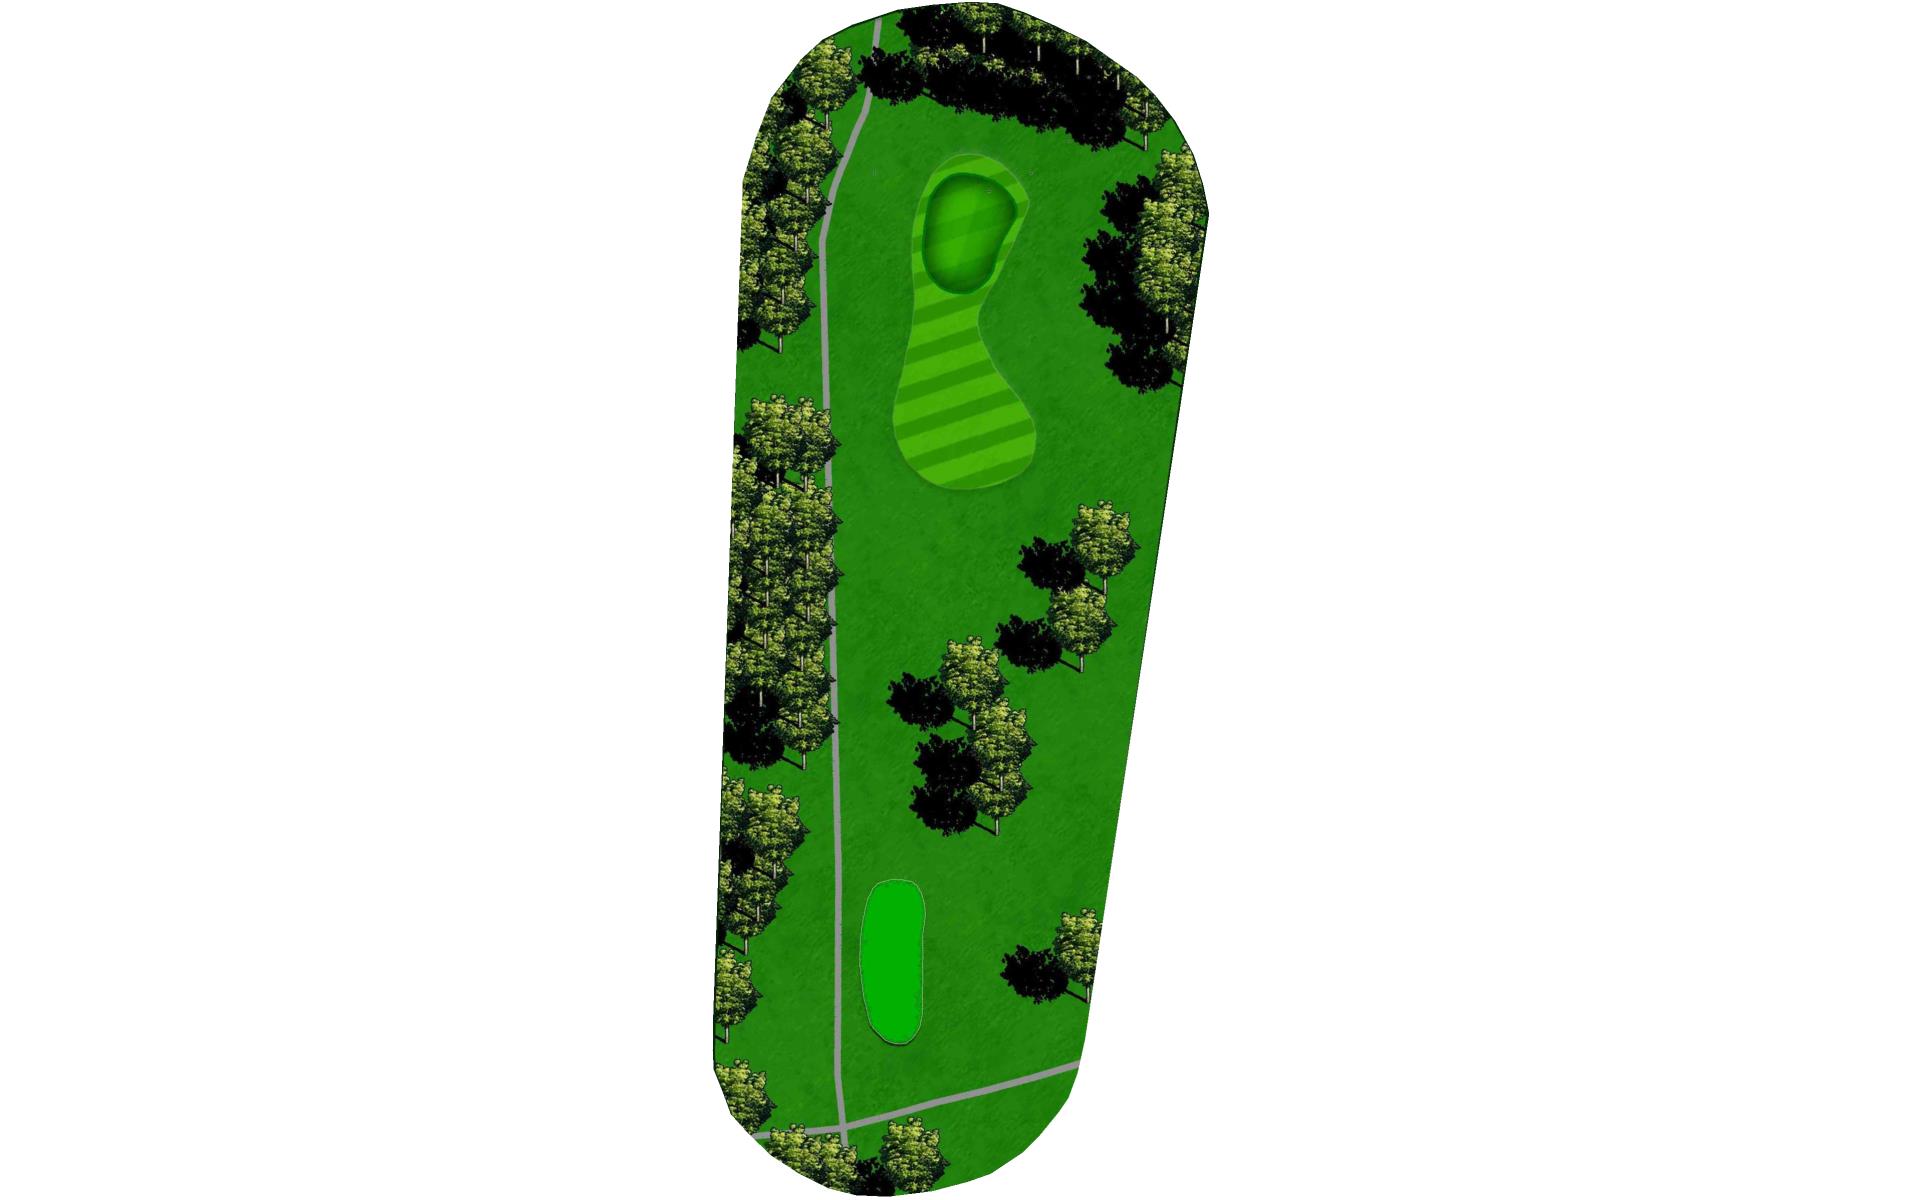
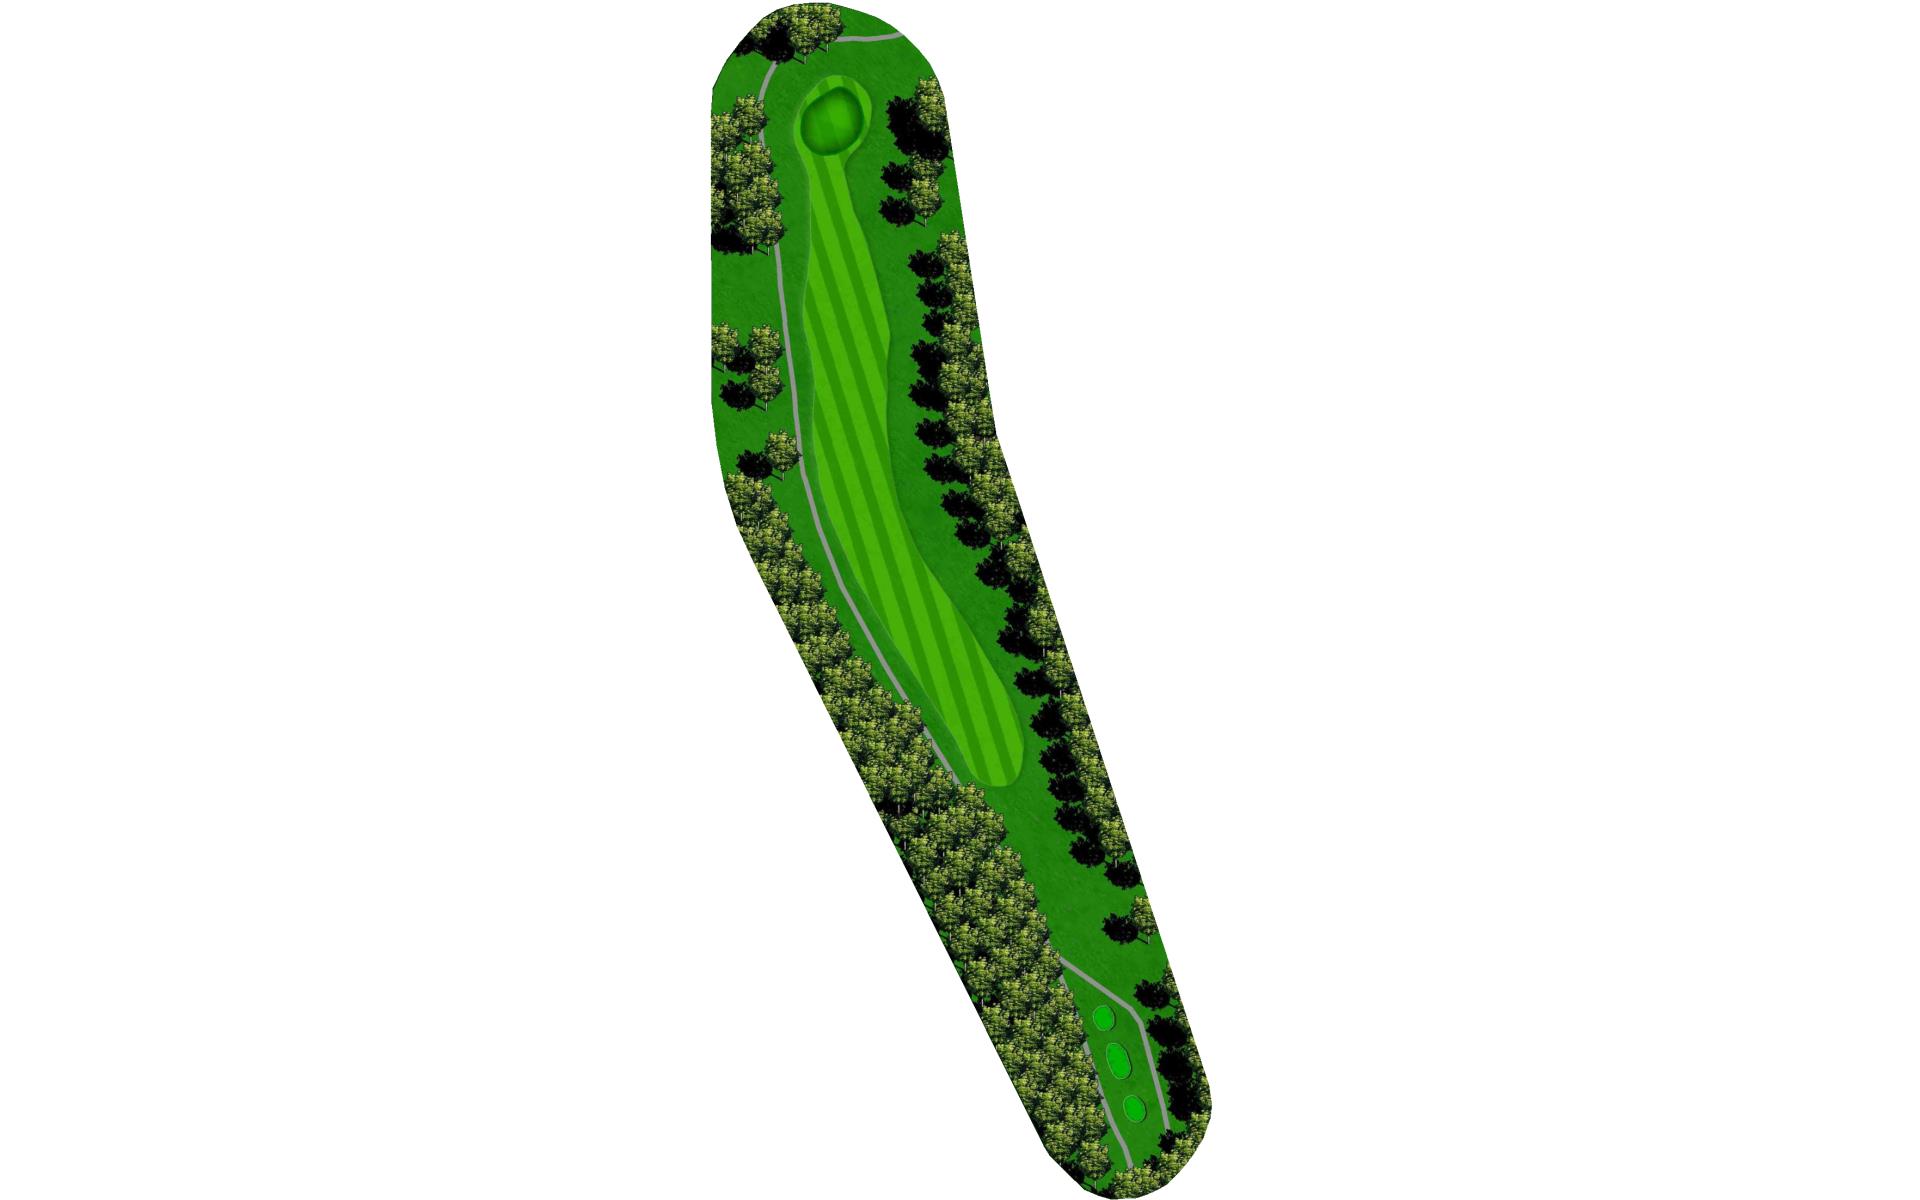
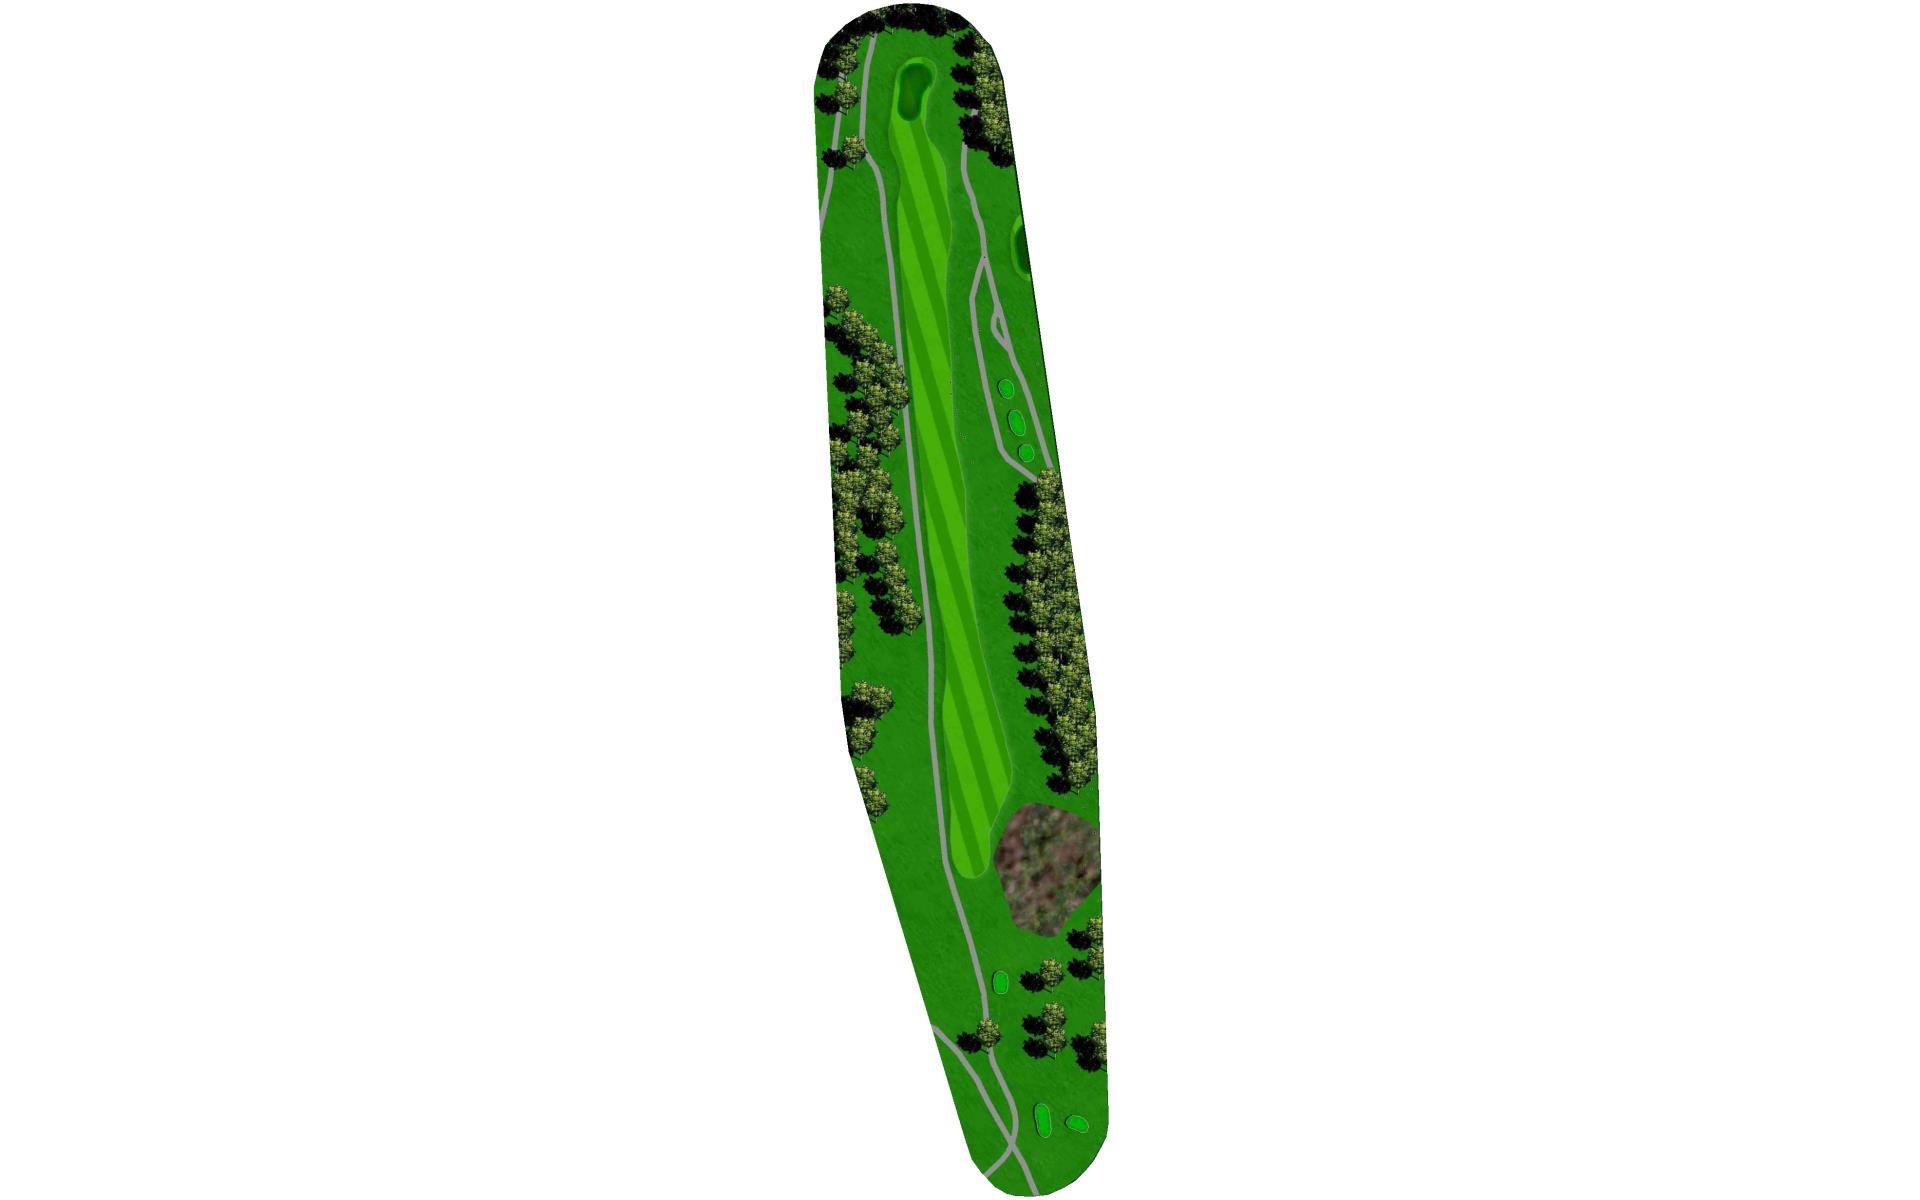
# 2 /
Par: 5
Yardage by Tee:
Gold 536
Blue 513
Combo 513
COPPER 448
Slope:
Gold 72.7/123 | Blue 71.2/120 | Combo 68.2/116 | White 67.5/113 | Red 71.8/123
Pro Tips
A 210 yd. tee shot straight away is the recommended play on this tight par 5. It is possible to shorten the hole by cutting the corner of the severe left dogleg, but it is not a smart play. Trees line the fairway on both sides, so accuracy is at a premium. The green is a small target for the approach shot, measuring only 15 paces deep.
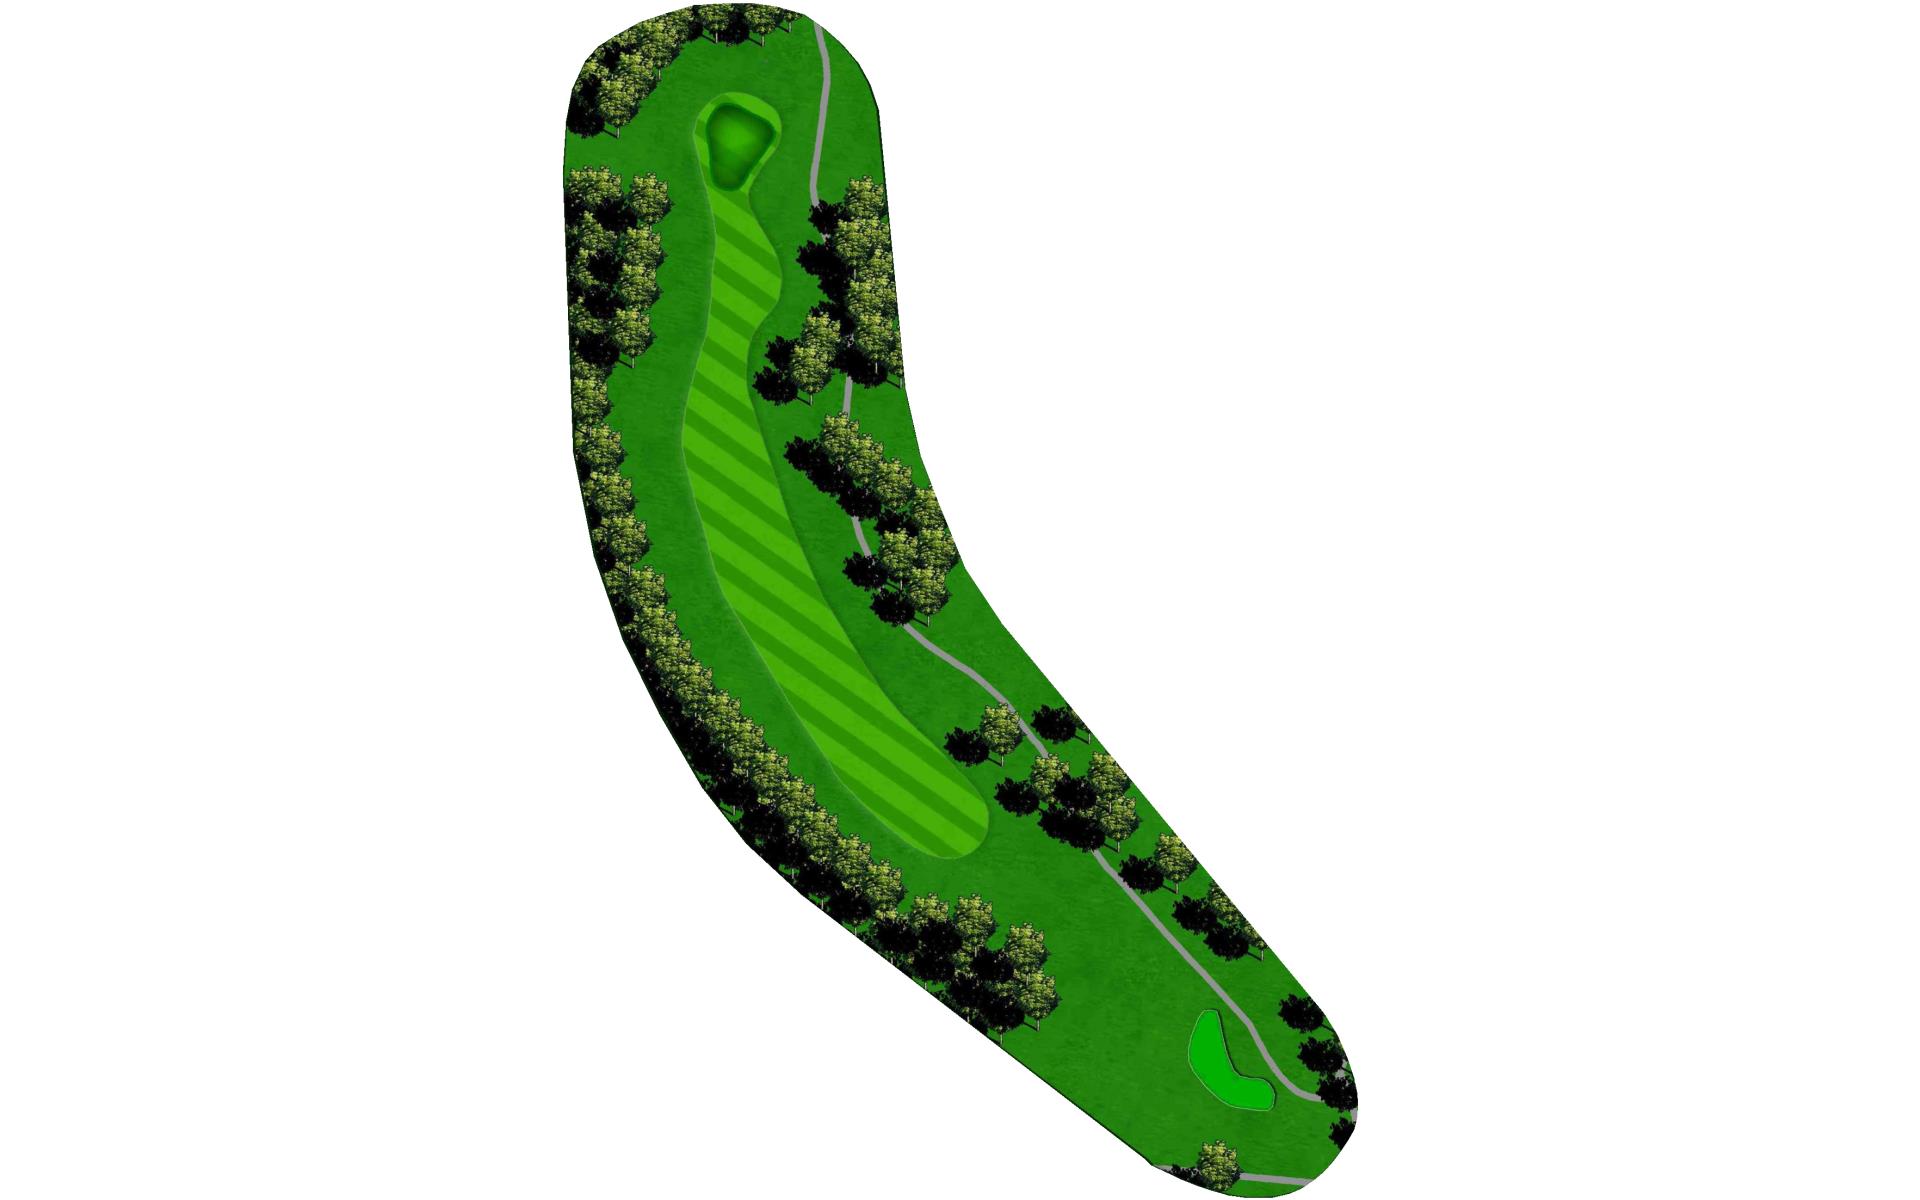
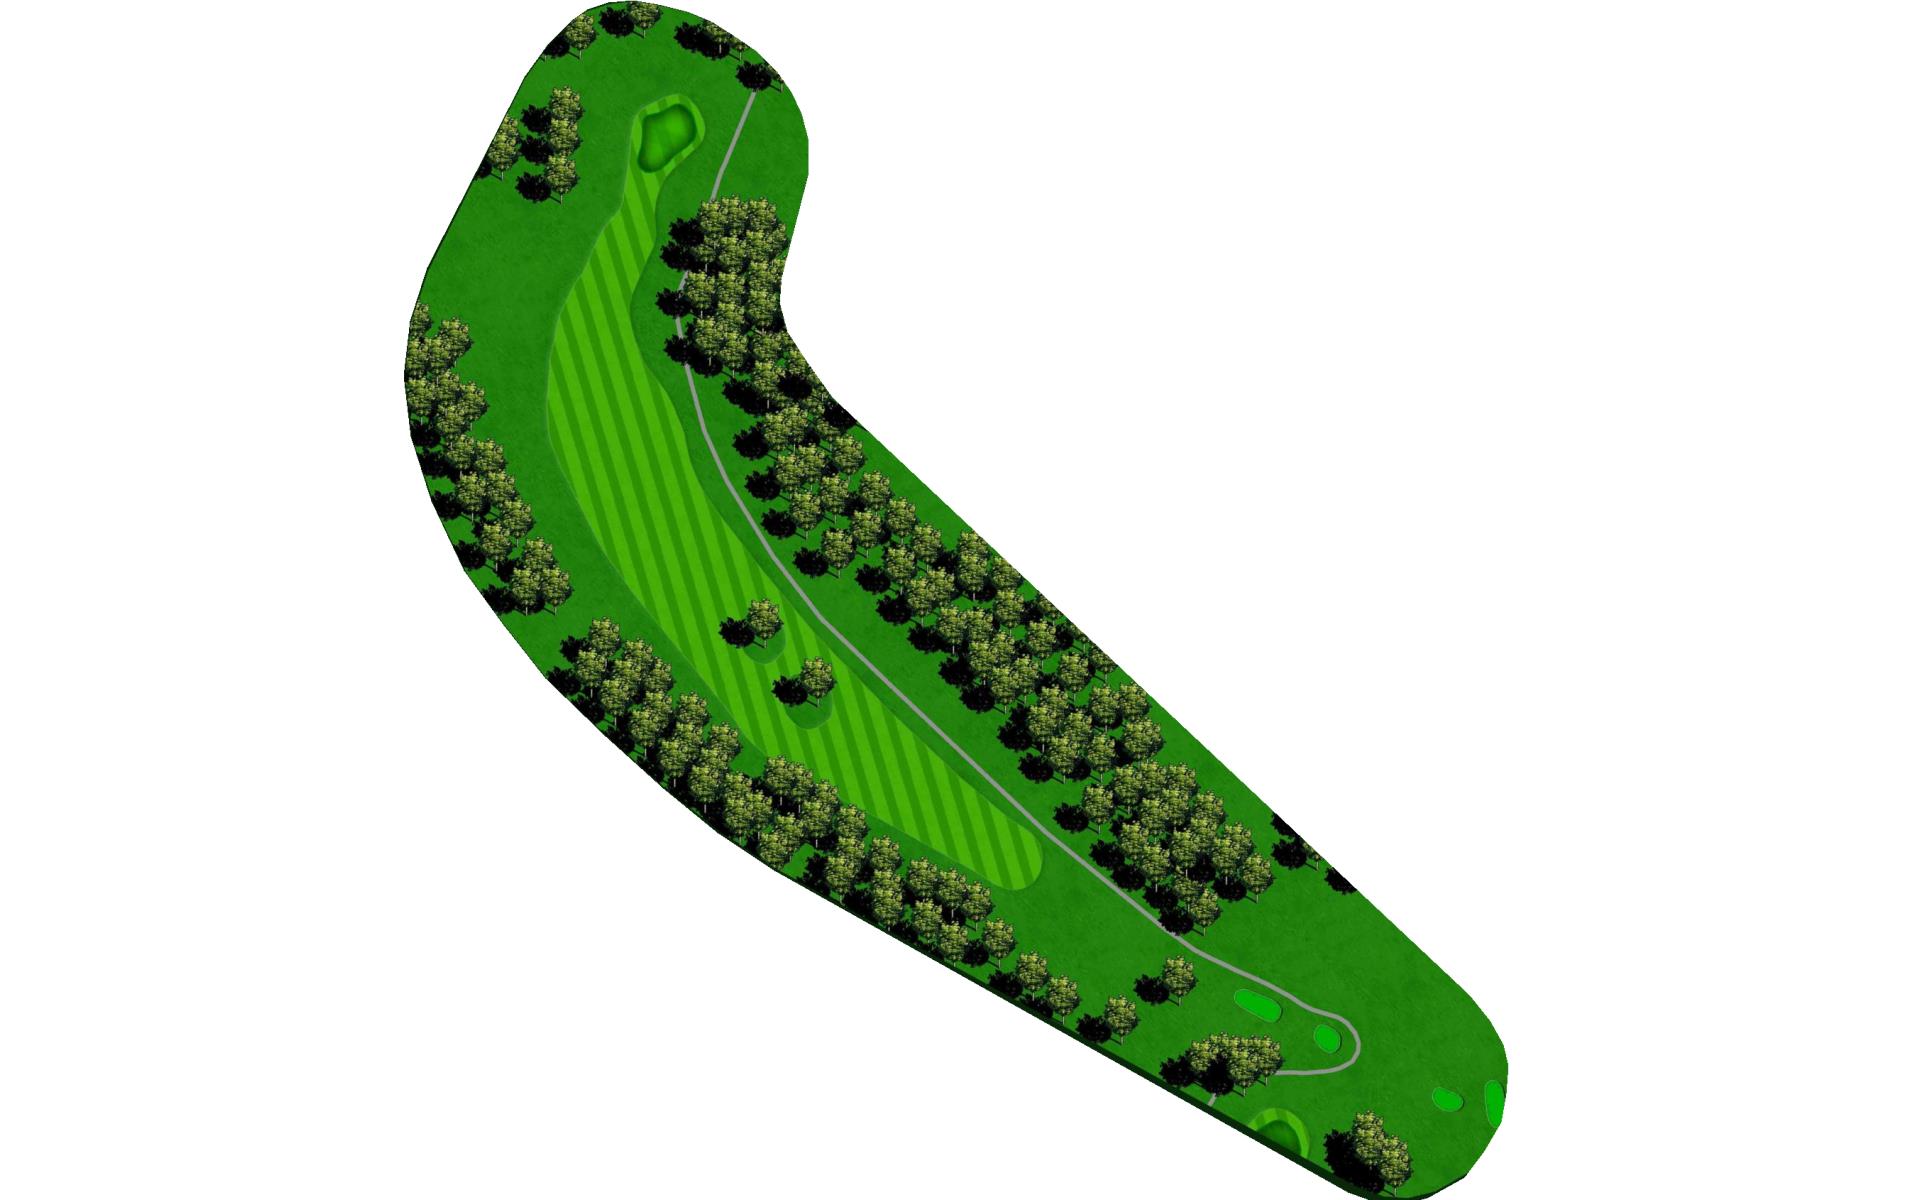
# 3 /
Par: 4
Yardage by Tee:
Gold 413
Blue 396
Combo 386
COPPER 386
Slope:
Gold 72.7/123 | Blue 71.2/120 | Combo 68.2/116 | White 67.5/113 | Red 71.8/123
Pro Tips
This hole is a slicer’s nightmare. A long draw off the tee will put you in perfect position off the tee on this long left dogleg. The green is a small one, surrounded by trees; be especially wary of the one guarding the right side of the green.
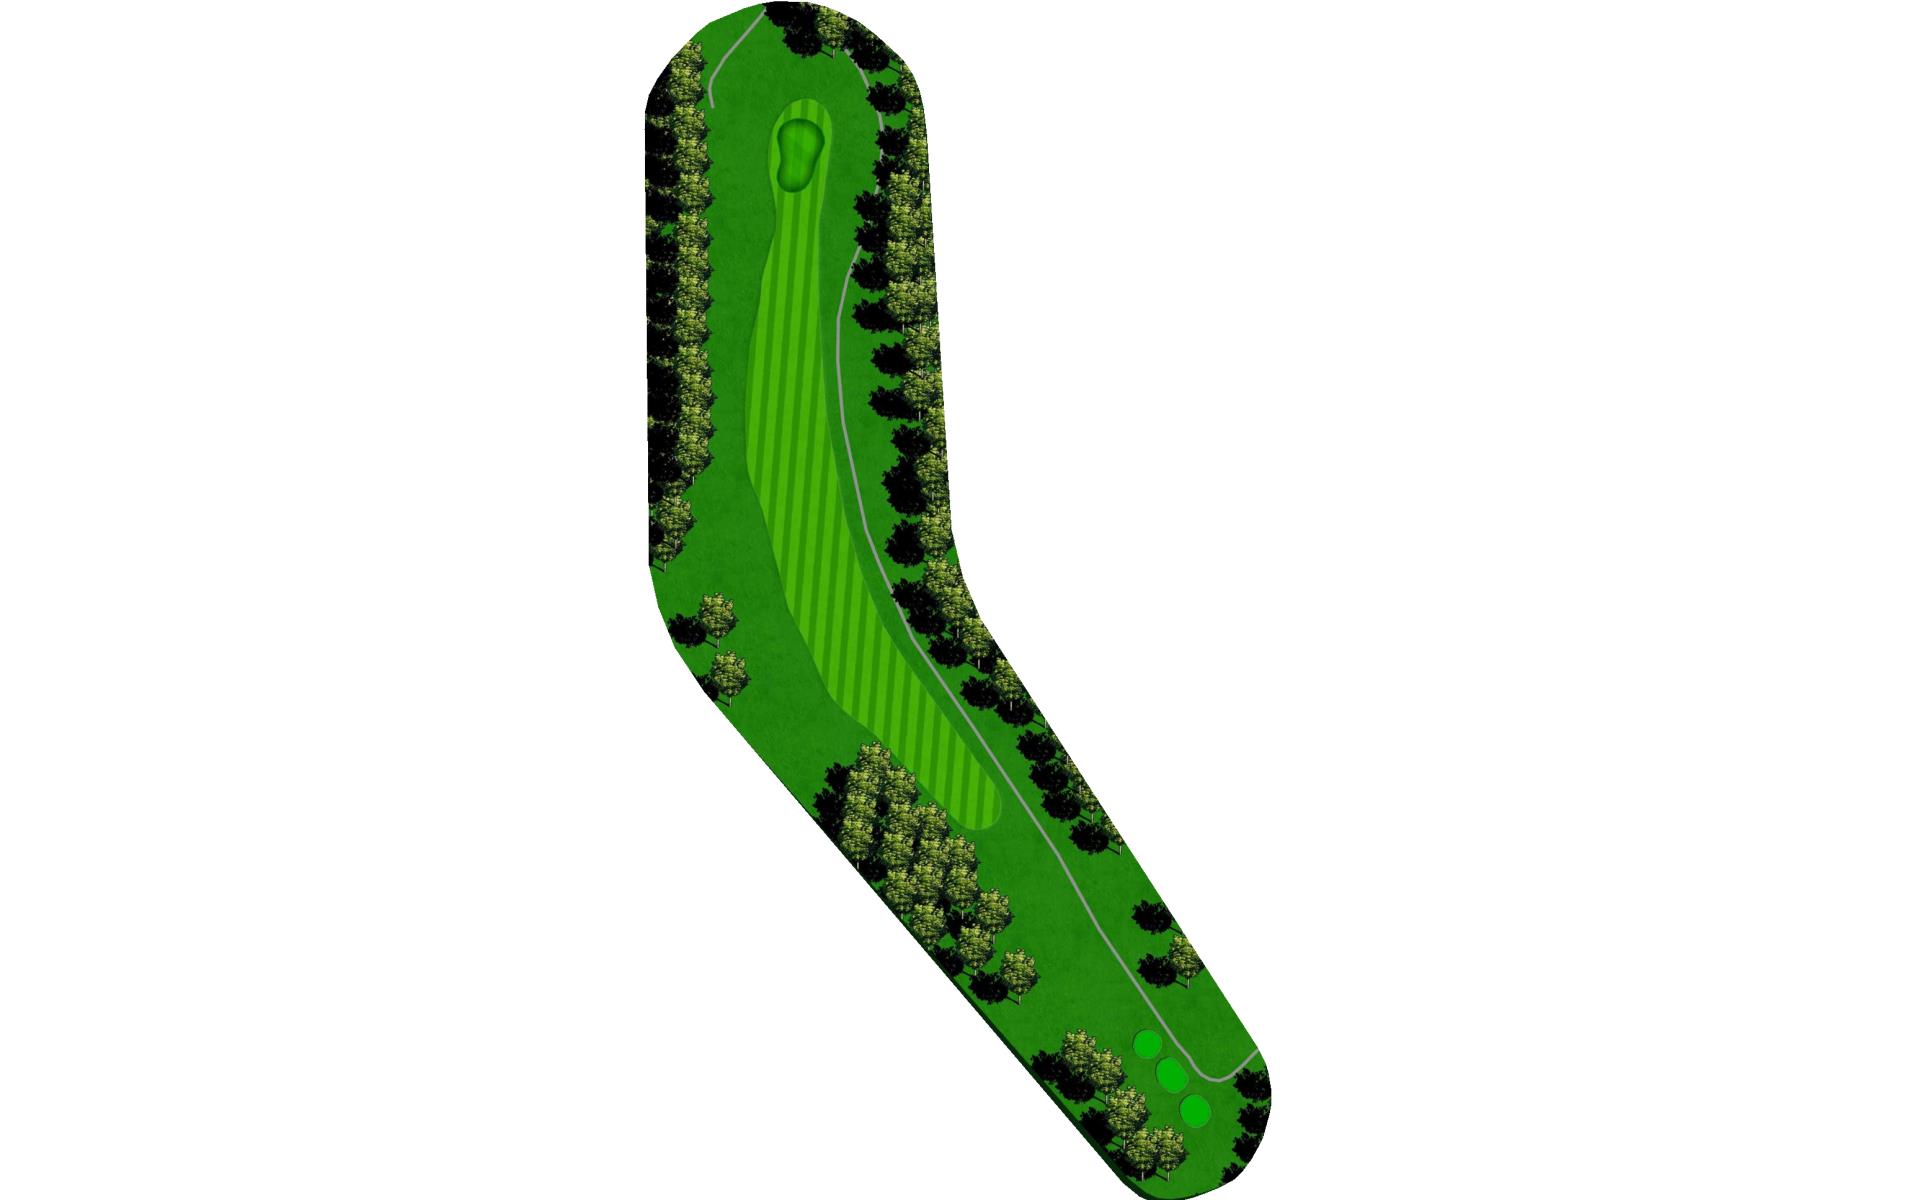
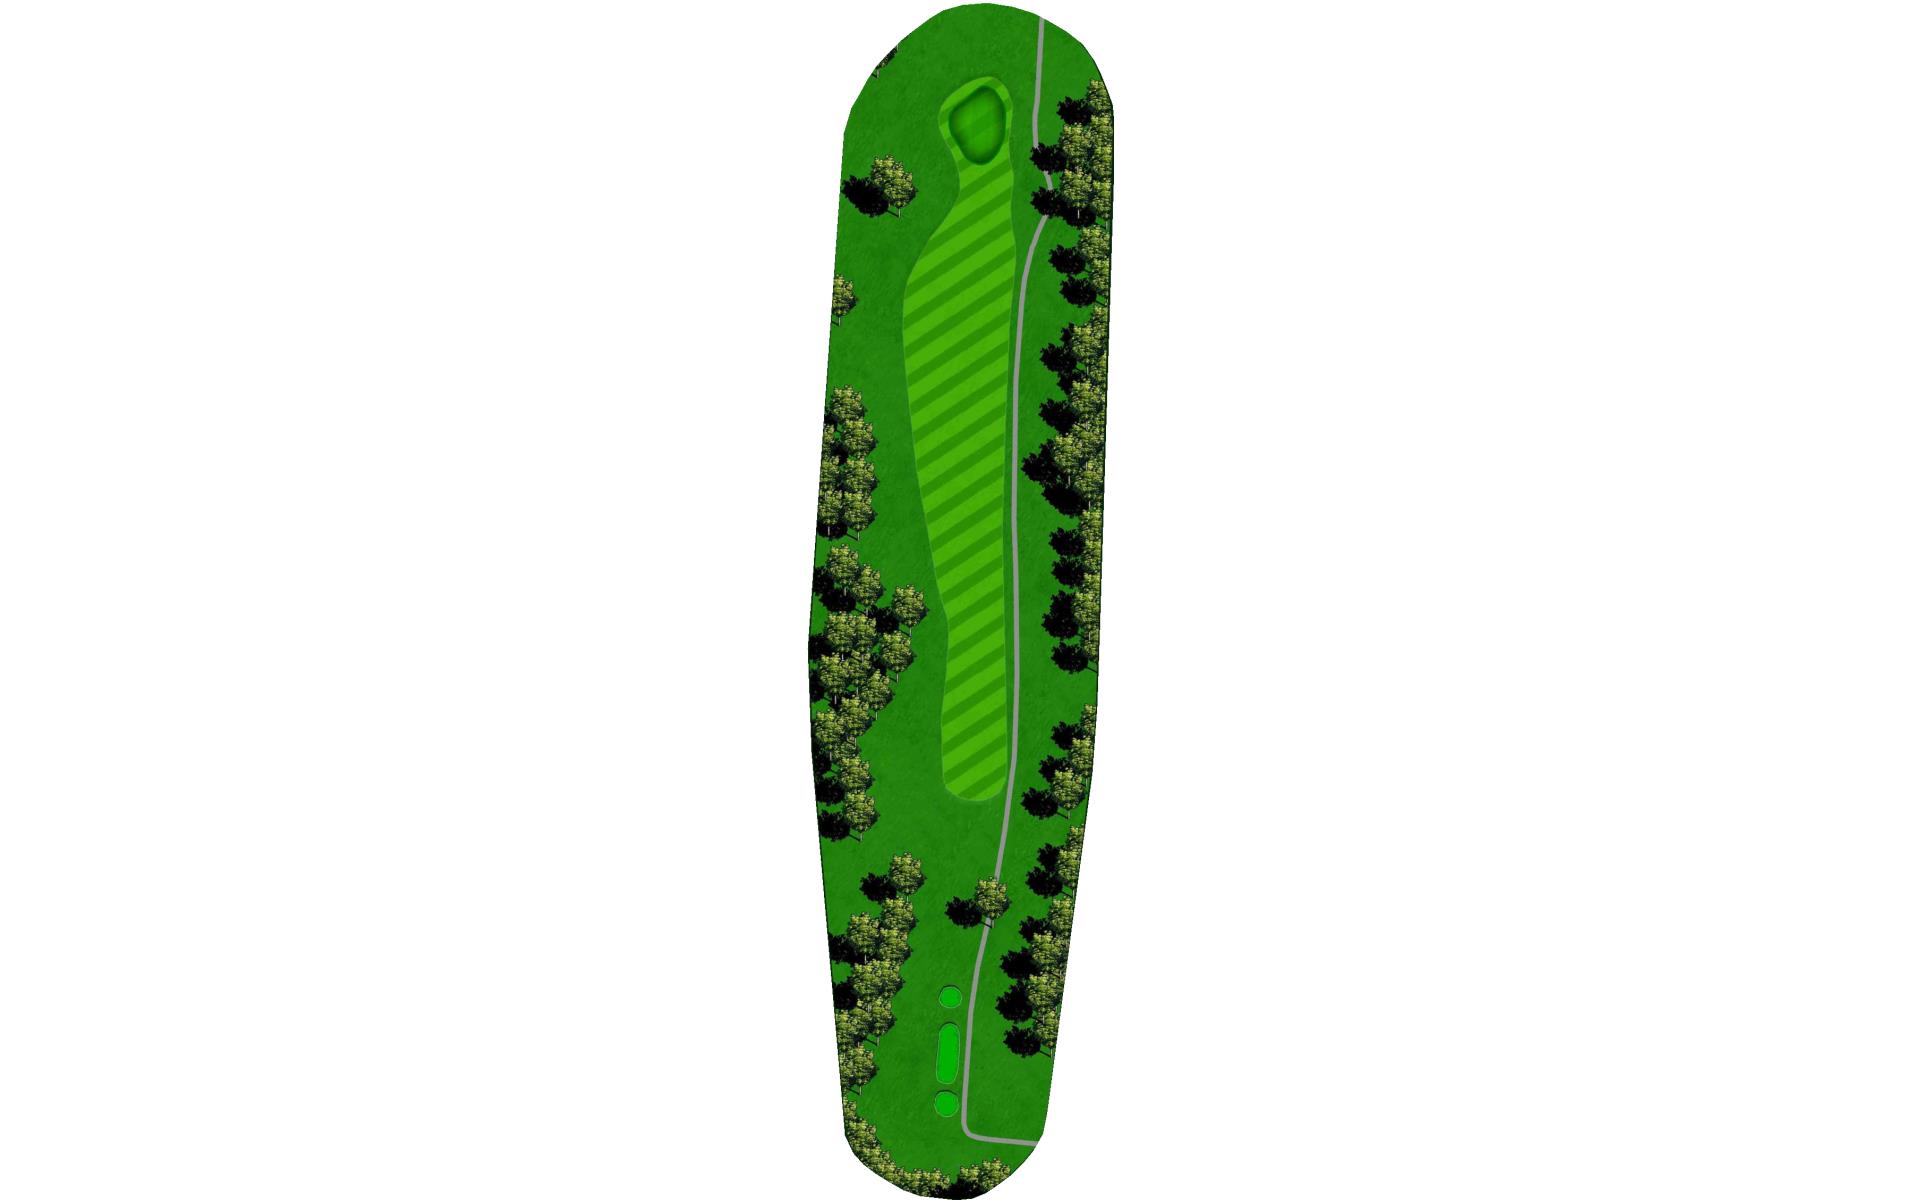
# 4 /
Par: 3
Yardage by Tee:
Gold 147
Blue 130
Combo 130
COPPER 111
Slope:
Gold 72.7/123 | Blue 71.2/120 | Combo 68.2/116 | White 67.5/113 | Red 71.8/123
Pro Tips
This short par 3 is a nice break from our two other par 3s. Be careful not to lose your focus, however. The green is small and raised, amplifying mistakes.
# 5 /
Par: 4
Yardage by Tee:
Gold 371
Blue 335
Combo 335
COPPER 272
Slope:
Gold 72.7/123 | Blue 71.2/120 | Combo 68.2/116 | White 67.5/113 | Red 71.8/123
Pro Tips
A 200 yd. shot at the 150 yd. marker is the play off the tee. Although not visible from the tee, the left side is lined by water. The elevated green makes the approach play longer than the yardage indicates, so plan accordingly. Approach shots missed to the right will invariably find their way into the water hazard. The green slopes back to front and is 20 paces deep.
# 6 /
Par: 4
Yardage by Tee:
Gold 412
Blue 392
Combo 268
COPPER 268
Slope:
Gold 72.7/123 | Blue 71.2/120 | Combo 68.2/116 | White 67.5/113 | Red 71.8/123
Pro Tips
A big drive is a must on this long left dogleg, and a mid to long iron will still be required for the approach shot. Don’t be fooled by the green’s false front; however, balls traveling over the green will leave players tricky pitch shots
# 7 /
Par: 5
Yardage by Tee:
Gold 560
Blue 543
Combo 496
COPPER 496
Slope:
Gold 72.7/123 | Blue 71.2/120 | Combo 68.2/116 | White 67.5/113 | Red 71.8/123
Pro Tips
This par 5 is a double dogleg, with a straightforward tee shot; however, the fun begins on your second shot as you try to avoid the numerous live oaks between you and the green. Your approach shot into the green will be downhill, so use less club than normal. The green is 22 paces deep.
# 8 /
Par: 3
Yardage by Tee:
Gold 157
Blue 156
Combo 156
COPPER 147
Slope:
Gold 72.7/123 | Blue 71.2/120 | Combo 68.2/116 | White 67.5/113 | Red 71.8/123
Pro Tips
The green is deeper than it appears from the tee on this uphill par 3. Again, allow for the elevation change in your club selection. DO NOT miss this green to the right!

# 9 /
Par: 4
Yardage by Tee:
Gold 360
Blue 331
Combo 312
COPPER 312
Slope:
Gold 72.7/123 | Blue 71.2/120 | Combo 68.2/116 | White 67.5/113 | Red 71.8/123
Pro Tips
Time to finish the inward nine with a birdie! This green is reachable by long hitters if a tail wind is present, short hitters should play to the left of the water hazard. A split level green awaits your approach shot.
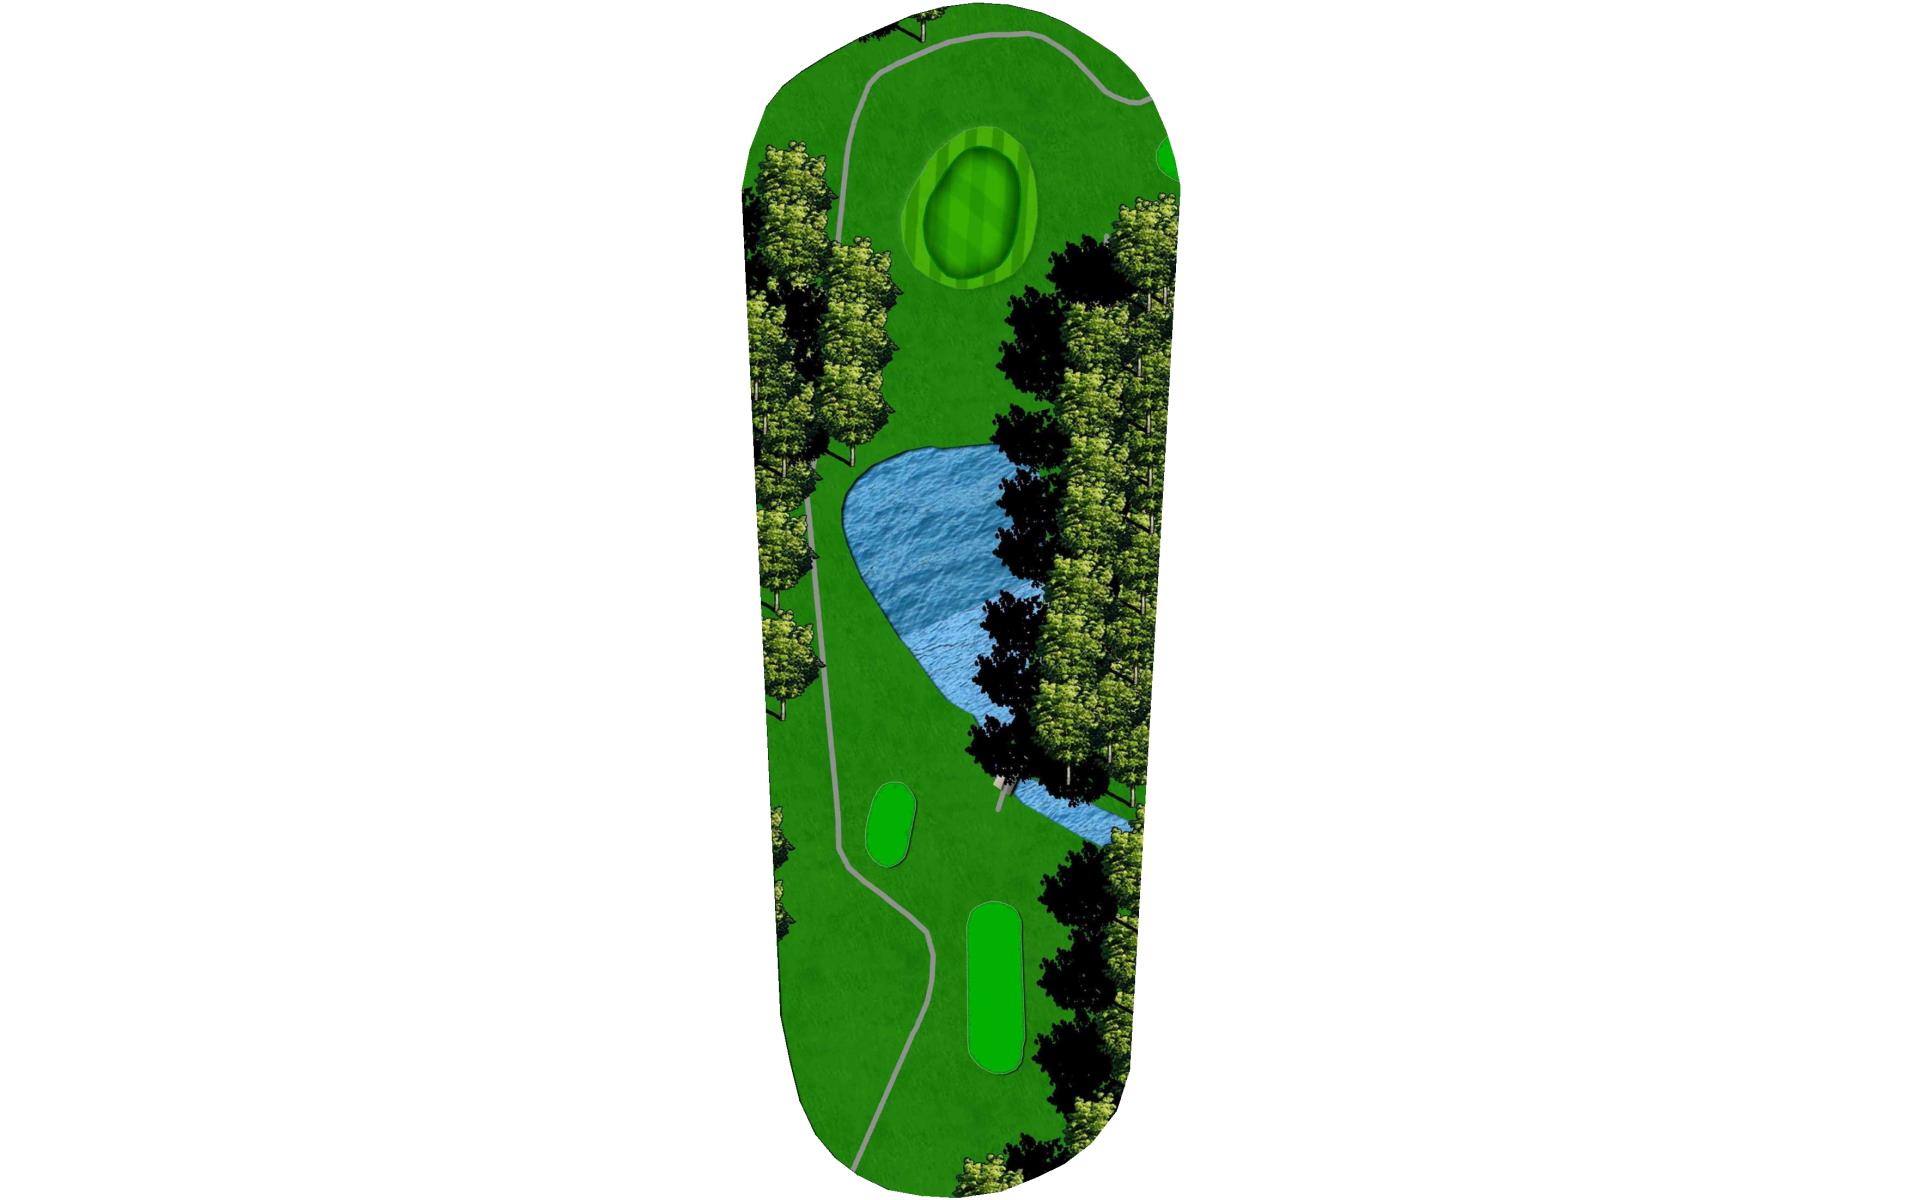
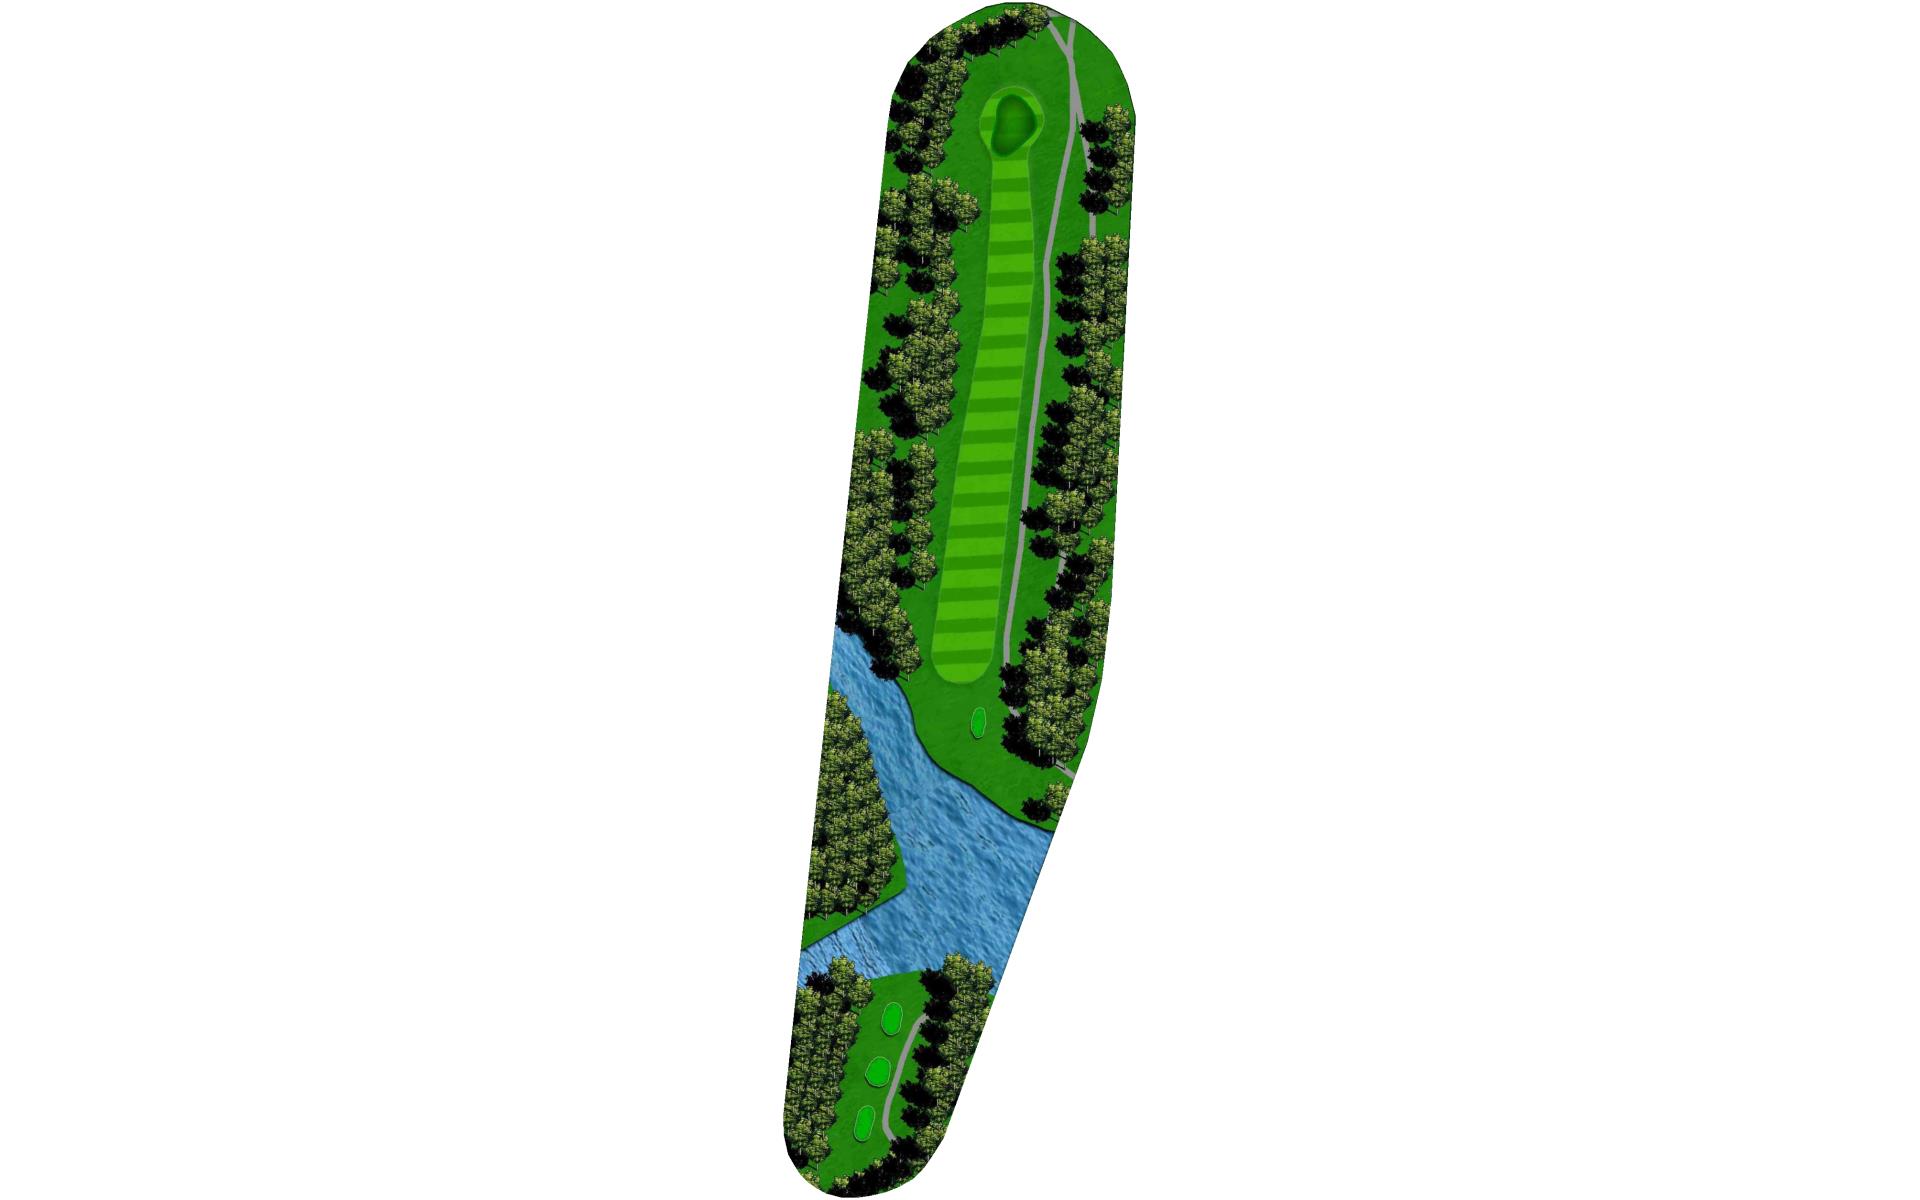
# 10 /
Par: 4
Yardage by Tee:
Gold 360
Blue 345
Combo 336
COPPER 336
Slope:
Gold 72.7/123 | Blue 71.2/120 | Combo 68.2/116 | White 67.5/113 | Red 71.8/123
Pro Tips
This short opening hole places a premium on position off the tee. The ideal tee shot will be approximately 200 yd., leaving a short iron into the green that slopes back to front. Be sure to favor the right side off the tee, as the fairway slopes severely right to left towards the water hazard.
# 11 /
Par: 4
Yardage by Tee:
Gold 365
Blue 358
Combo 358
COPPER 351
Slope:
Gold 72.7/123 | Blue 71.2/120 | Combo 68.2/116 | White 67.5/113 | Red 71.8/123
Pro Tips
Big hitters can cut the corner on this slight right dogleg, but the smart play is down the middle off the tee. Keep the approach shot right of the pin, as the ball will release to the left upon reaching the green.
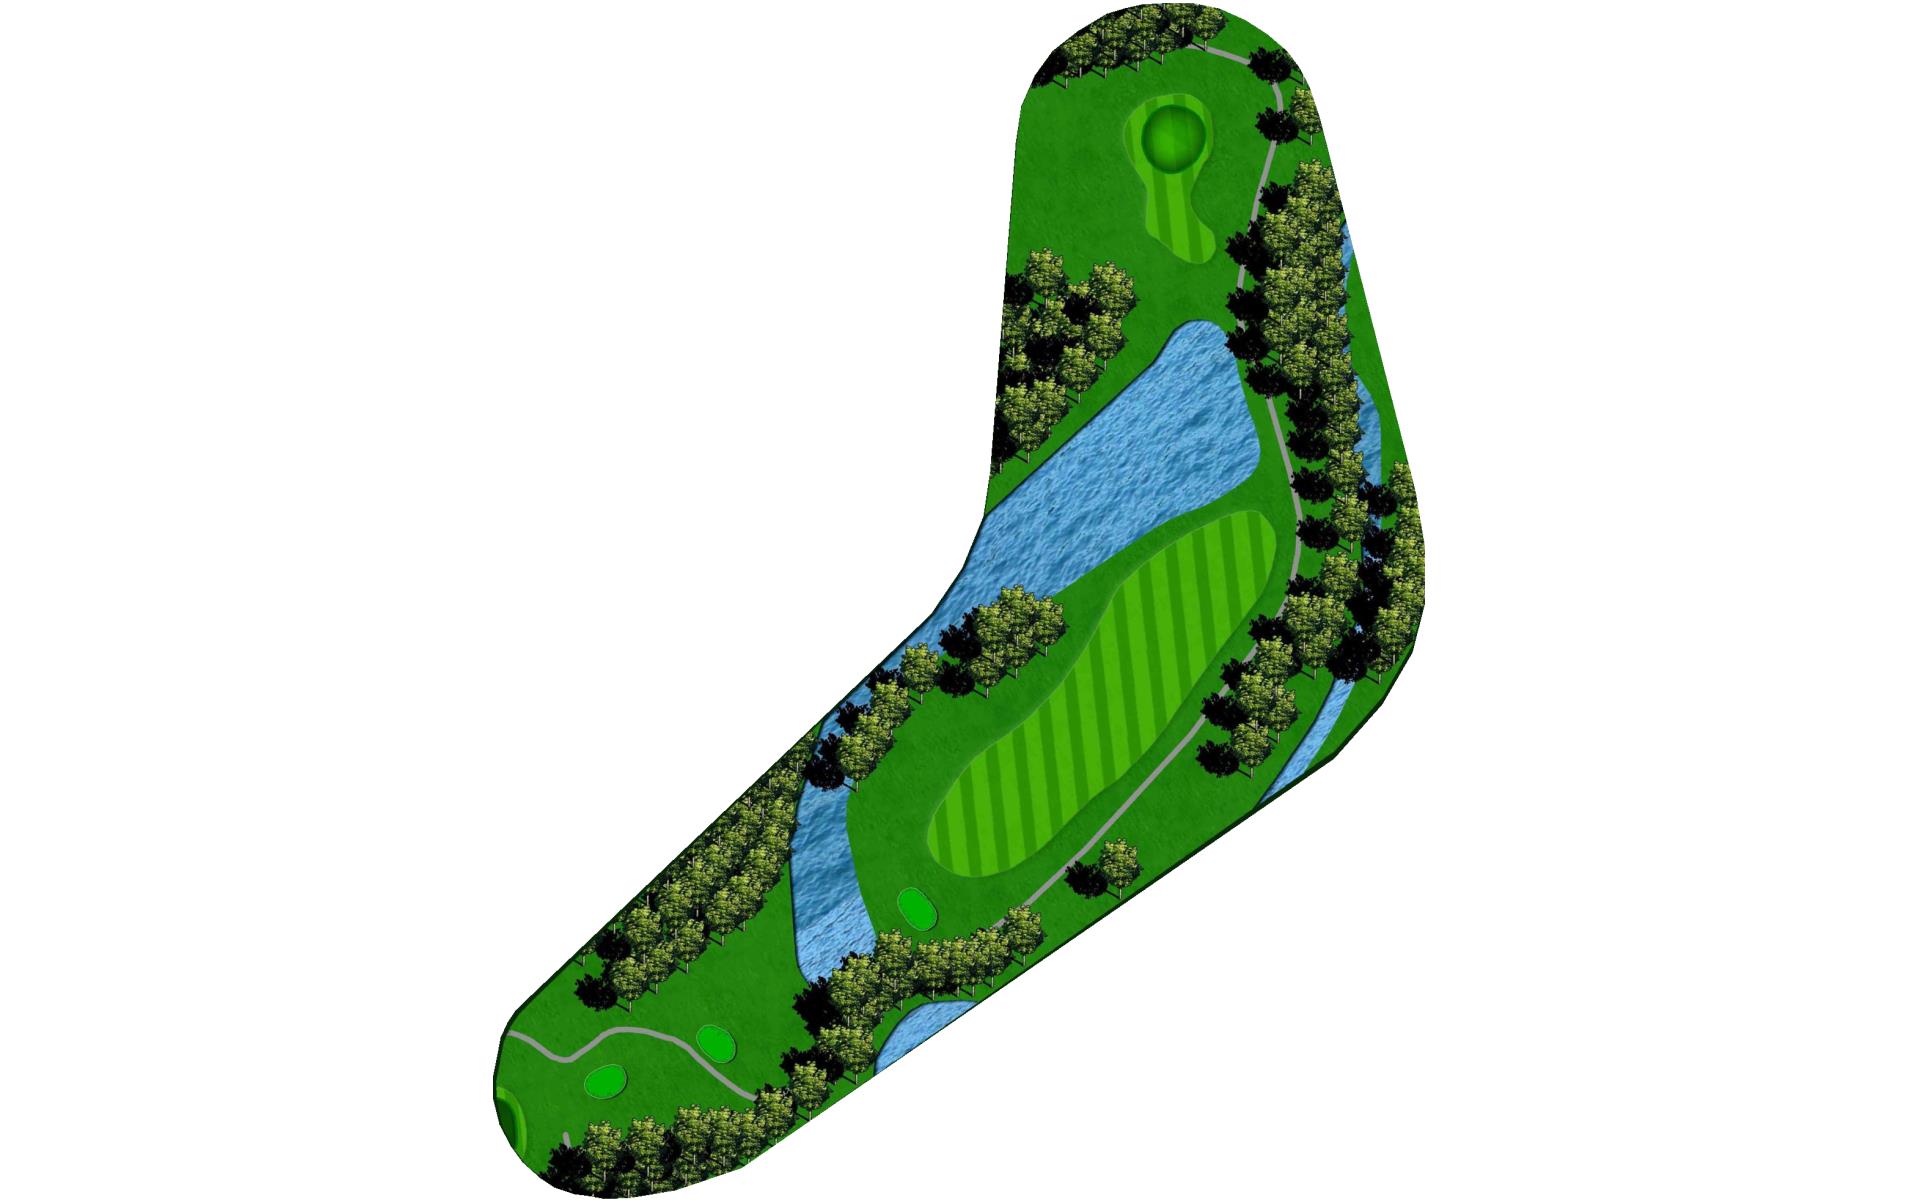
# 12 /
Par: 3
Yardage by Tee:
Gold 207
Blue 175
Combo 118
COPPER 118
Slope:
Gold 72.7/123 | Blue 71.2/120 | Combo 68.2/116 | White 67.5/113 | Red 71.8/123
Pro Tips
Beware: “Jaws” is the name given to this difficult par 3 by the members. Be sure to use enough club, as balls hit short of the green will be lost forever. If your tee shot is “less than perfect” and comes to rest in the water hazard, please hit your 3rd shot from the drop circle located to the right of the green.
# 13 /
Par: 4
Yardage by Tee:
Gold 389
Blue 381
Combo 381
COPPER 369
Slope:
Gold 72.7/123 | Blue 71.2/120 | Combo 68.2/116 | White 67.5/113 | Red 71.8/123
Pro Tips
This right dogleg requires a big drive down the left side of the fairway to setup the optimum second shot. There is a reachable water hazard in the right rough that is not visible from the tee, so exercise caution. The green itself is large and forgiving—a nice change of pace.
# 14 /
Par: 5
Yardage by Tee:
Gold 530
Blue 474
Combo 474
COPPER 454
Slope:
Gold 72.7/123 | Blue 71.2/120 | Combo 68.2/116 | White 67.5/113 | Red 71.8/123
Pro Tips
The first par 5 on the course, this hole is reachable for long knockers and a birdie opportunity for most players. Aim your drive just left of the cart path, taking the large trees in the middle of the fairway out of play. If you are unable to go for the green on your second shot, position your shot to the left of the small grove of trees to the right, leaving you less than 100 yd. to the green. The green is two-tiered, so pay close attention to the hole location when planning your approach shot.
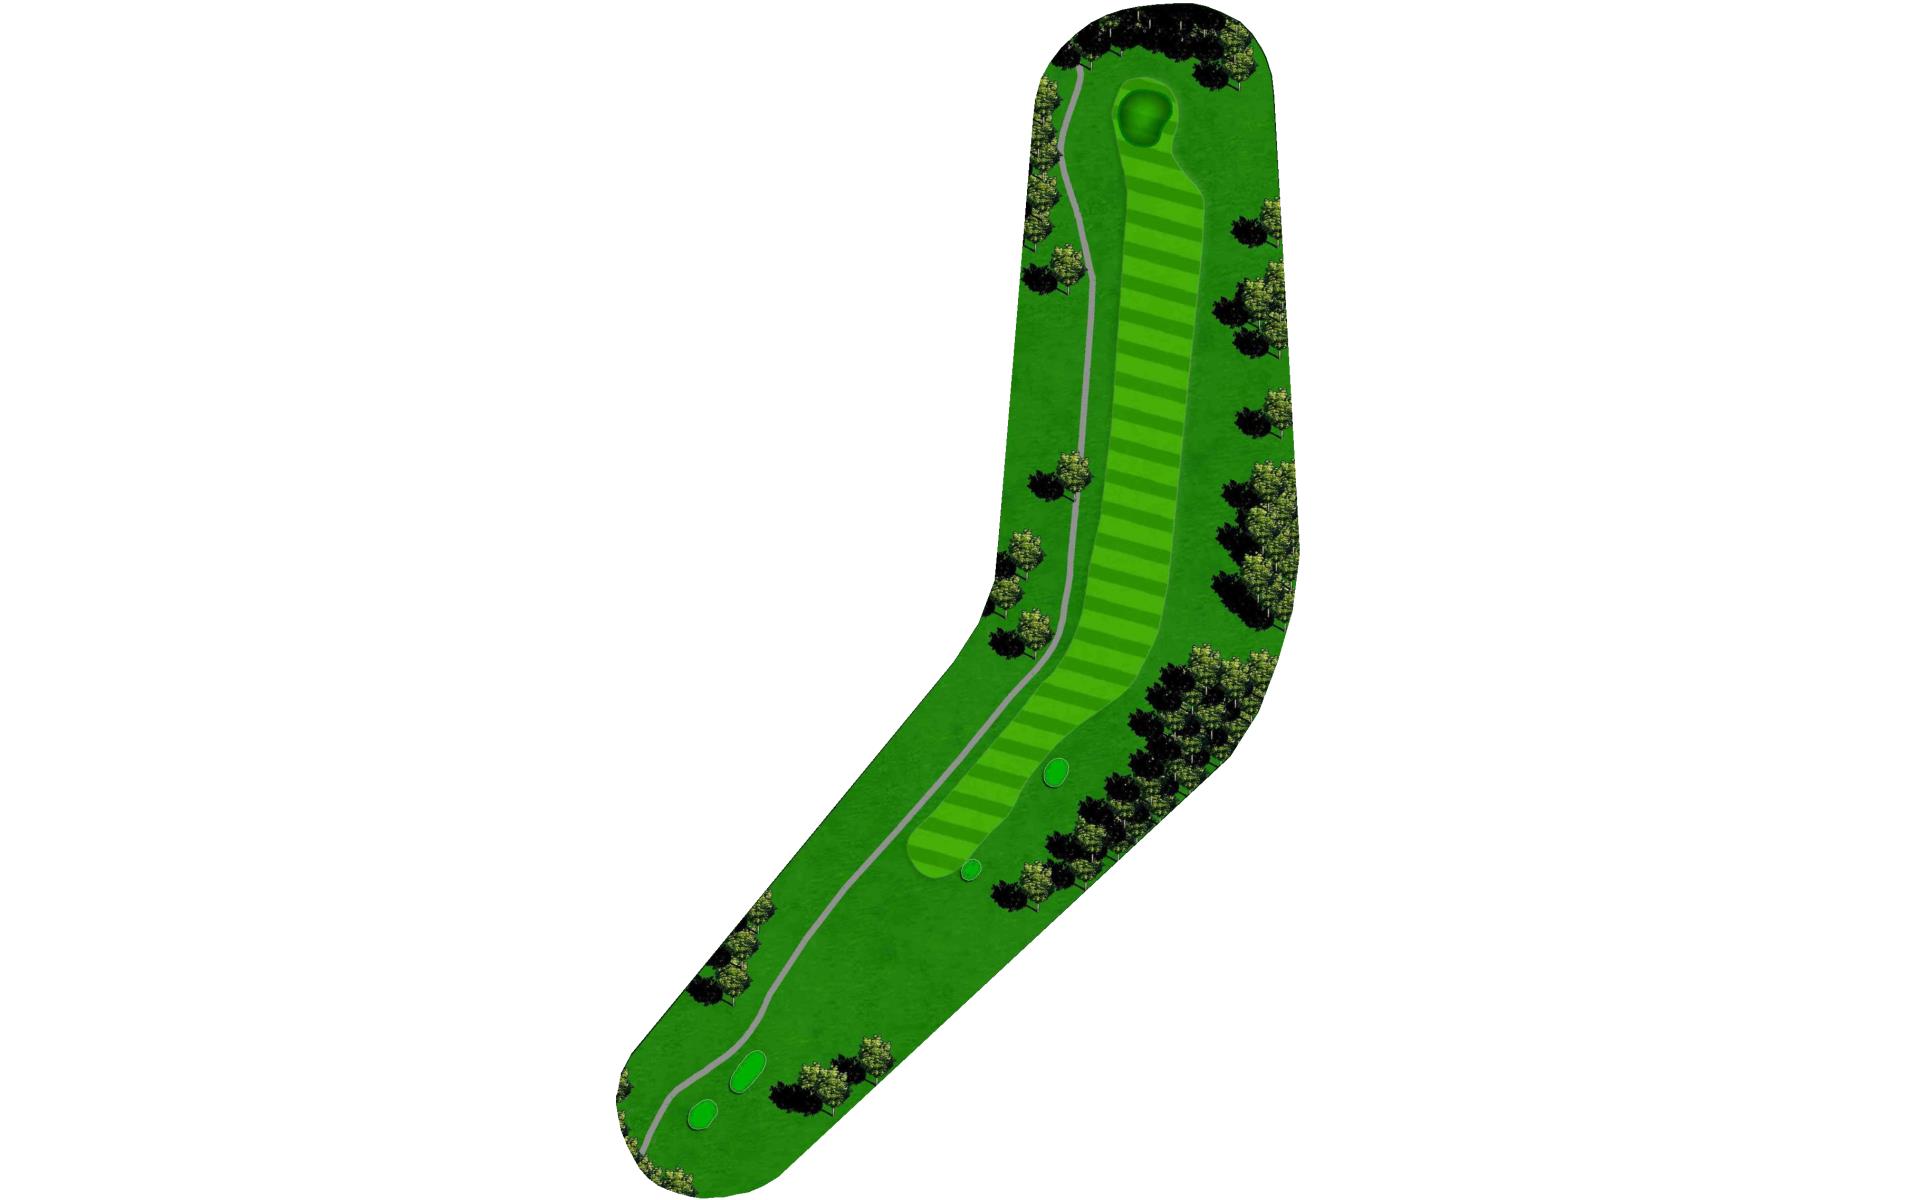
# 15 /
Par: 4
Yardage by Tee:
Gold 356
Blue 344
Combo 344
COPPER 330
Slope:
Gold 72.7/123 | Blue 71.2/120 | Combo 68.2/116 | White 67.5/113 | Red 71.8/123
Pro Tips
The straightest hole on the golf course, aim directly at the 150 yd. marker off the tee.The green is deeper than it appears from the fairway, so club selection is important. A shot finding the green will be rewarded with a fairly flat, straight putt.
# 16 /
Par: 3
Yardage by Tee:
Gold 217
Blue 174
Combo 174
COPPER 138
Slope:
Gold 72.7/123 | Blue 71.2/120 | Combo 68.2/116 | White 67.5/113 | Red 71.8/123
Pro Tips
The only trouble on this straightforward par 3 is hitting a accurate 207 yd. shot!
# 17 /
Par: 5
Yardage by Tee:
Gold 554
Blue 543
Combo 474
COPPER 474
Slope:
Gold 72.7/123 | Blue 71.2/120 | Combo 68.2/116 | White 67.5/113 | Red 71.8/123
Pro Tips
The longer the tee shot, the narrower the landing area on this slight right dogleg par 5. OB lurks dangerously close on the left side for your second shot— hookers beware. Take notice of the hole location when planning your approach shot; this two-tiered green slopes from back to front, and is responsible for many a three putt.
# 18 /
Par: 4
Yardage by Tee:
Gold 459
Blue 411
Combo 274
COPPER 274
Slope:
Gold 72.7/123 | Blue 71.2/120 | Combo 68.2/116 | White 67.5/113 | Red 71.8/123
Pro Tips
The number 1 handicap hole, this difficult par 4 plays even longer than the yardage on the scorecard—it’s uphill all the way. Should you be lucky enough to find the fairway off the tee, remember to allow an extra club or two on the approach to make up the change in elevation. When you finally reach the green, you will find yet another two-tiered green awaiting you.